1. Getting Started
Repast for Python (Repast4Py) is the newest member of the Repast Suite of free and open source agent-based modeling and simulation software. It builds on Repast HPC, and provides the ability to build large, distributed agent-based models (ABMs) that span multiple processing cores. Distributed ABMs enable the development of complex systems models that capture the scale and relevant details of many problems of societal importance.[1][2] Where Repast HPC is implemented in C++ and is more HPC expert focused, Repast4Py is a Python package and is designed to provide an easier on-ramp for researchers from diverse scientific communities to apply large-scale distributed ABM methods. Repast4Py is released under the BSD-3 open source license, and leverages Numba, NumPy, and PyTorch packages, and the Python C API to create a scalable modeling system that can exploit the largest HPC resources and emerging computing architectures. See our paper on Repast4Py for additional information about the design and implementation.[3]
1.1. Requirements
Repast4Py can run on Linux, macOS and Windows provided there is a working MPI implementation installed and mpi4py is supported. Repast4Py is developed and tested on Linux. We recommend that Windows users use the Windows Subsystem for Linux (WSL). Installation instructions for WSL can be found here.
Under Linux, MPI can be installed using your OS’s package manager. For example, under Ubuntu 22.04 (and thus WSL), the mpich MPI implementation can be installed with:
$ sudo apt install mpichInstallation instructions for MPI on macOS can be found here.
A typical campus cluster, or HPC resource will have MPI and mpi4py installed. Check the resource’s documentation on available software for more details.
1.2. Installation
Repast4Py can be downloaded and installed from PyPI using pip.
Since Repast4Py includes native MPI C++ code that needs to be compiled,
the C compiler CC environment variable must be set
to the mpicxx (or mpic++) compiler wrapper provided by your MPI installation.
Depending on the operating system, the CXX variable may also need to be set.
env CC=mpicxx CXX=mpicxx pip install repast4py
If you see an error message about a missing python.h header file when
installing Repast4Py under Ubuntu (or other Linuxes), you will need to install
a python dev package using your OS’s package manager. For example, assuming
Python 3.8, sudo apt install python3.8-dev will work for Ubuntu.
|
The preferred install is into a Python virtual environment.
$ python3 -m venv path/to/repast4py_venv
$ source path/to/repast4py_venv/bin/activate
(repast4py_venv) $ env CC=mpicxx CXX=mpicxx pip install repast4py
The environment only needs to be created once with python3 -m venv …,
but does need to be sourced in order to be used.
| Using Repast4Py in a conda environment can have issues. Conda may install its own MPI distribution, and its own C/C++ compiler. These can conflict with those installed on the host OS. Using a non-conda Python virtual environment is recommended. |
1.3. Documentation
-
User’s Guide (This document)
1.4. Contact and Support
In addition to filing issues on GitHub, support is also available via
Stack Overflow.
Please use the repast4py tag to ensure that we are notified of your question.
Software announcements will be made on the
repast-interest mailing list.
Jonathan Ozik is the Repast project lead. Please contact him through the Argonne Staff Directory if you have project-related questions.
2. Why Repast4Py?
Modern high-performance computing (HPC) capabilities have allowed for large-scale computational modeling and experimentation. HPC clusters and supercomputers — such as those hosted by universities, national laboratories, and cloud computing providers — can have thousands or more processor cores available, allowing for high concurrency. Even individual CPUs now typically contain multiple cores, which are capable of running concurrently. Distributed ABMs attempt to leverage this hardware by distributing an individual simulation over multiple processes running in parallel.
However, in order to take advantage of these increasingly ubiquitous parallel computing resources, a computational model must first be refashioned to run on multiple processors. Adapting a computational model that was built for a single processor to run on multiple processors can be a nontrivial endeavor, both conceptually and practically. Repast4Py aims to ease the transition to distributed ABMs by hiding much of the complexity.
2.1. Distributed computing a natural fit for agent-based modeling
A typical agent-based simulation consists of a population of agents each of which performs some behavior each timestep or at some frequency. In practice, this is often implemented as a loop over the agent population in which each agent executes its behavior. The time it takes to complete the loop depends on the number of agents and the complexity of the behavior. By distributing the agent population across multiple processes running in parallel, each process executes its own loop over only a subset of the population, allowing for larger agent populations and more complex behavior.
2.2. Repast4Py and the broader Repast family
While Repas4Py is meant to make the development of distributed ABMs easier, we encourage users new to the Repast Suite to look through the different versions of Repast to determine which toolkit is most appropriate for their needs. Of note, we recommend users new to agent-based modeling to first check out Repast Simphony to develop a better understanding of the concepts behind agent-based modeling and learn how to quickly build such models.
The following sections will provide some conceptual background for a Repast-style simulation, describe how such a simulation is distributed across multiple processes with Repast4Py, and end with providing a few basic tutorials.
3. Repast Simulation Overview
This overview section will provide some conceptual background for a Repast-style simulation as well as describing how such a simulation is distributed across multiple processes.
3.1. Contexts and Projections
Like the other members of the Repast ABM family, Repast4Py organizes a model in terms of contexts and projections. A context is a simple container with set semantics. Any type of object can be put into a context, with the simple caveat that only one instance of any given object can be contained by the context. From a modeling perspective, the context represents a population of agents. The agents in a context are the population of a model. However, the context does not inherently provide any relationship or structure for that population. Projections take the population as defined in a context and impose a structure on it. Actual projections are such things as a network structure that allows agents to form links (network type relations) with each other, a grid where each agent is located in a matrix-type space, or a continuous space where an agent’s location is expressible as a non-discrete coordinate. Projections have a many-to-one relationship with contexts. Each context can have an arbitrary number of projections associated with it. When writing a model, you will create a context, populate it with agents, and attach projections to that context.
3.2. Scheduling Events
A Repast simulation moves forward by repeatedly determining the next event to execute and then executing that event. Events in Repast simulations are driven by a discrete-event scheduler. These events are scheduled to occur at a particular tick. Ticks do not necessarily represent clock-time but rather the priority of an associated event. In this way, ticks determine the order in which events occur with respect to each other. For example, if event A is scheduled at tick 3 and event B at tick 6, event A will occur before event B. Assuming nothing is scheduled at the intervening ticks, A will be immediately followed by B. There is no inherent notion of B occurring after a duration of 3 ticks. Of course, ticks can and are often given some temporal significance through the model implementation. A traffic simulation, for example, may move the traffic forward the equivalent of 30 seconds for each tick. Events can also be scheduled dynamically such that the execution of an event may schedule further events at that same or at some future tick. When writing a model, you will create a Schedule object and schedule events using that object. The events are essentially Python Callables (methods or functions) scheduled for execution at some particular tick or tick frequency.
3.3. Distributed Simulation
Repast4Py was designed from the ground up as a distributed simulation framework. In practice, this means that the simulation is spread over multiple computer processes none of which have access to each other’s memory, and communicate via message passing using the Message Passing Interface (MPI) and its Python implementation MPI for Python (mpi4py).
| Repast4Py can also be used to implement a non-distributed simulation by restricting the simulation to a single process. |
Repast4Py distributes a simulation by providing shared implementations of the components described above. By shared, we want to emphasize the partitioned and distributed nature of the simulation. The global simulation is shared among a pool of processes, each of which is responsible for some portion of it, and stiched into a global whole through the use of non-local, or ghost, agents and buffered projections.
An MPI application identifies its processes by a rank id. For example, if the application is run with 4 processes, there will be 4 ranks: 0 - 3. The code in an MPI appliction is run concurrently on each rank. Anything instantiated in that code resides in that processes' memory and is local to that process. Other processes do not have access to the variables, objects, etc. created on another process. A simple "hello world" type MPI4Py script illustrates this.
1
2
3
4
5
6
7
# hello_world.py
from mpi4py import MPI
size = MPI.COMM_WORLD.Get_size() (1)
rank = MPI.COMM_WORLD.Get_rank() (2)
print('Hello, World! I am process {} of {}'.format(rank, size)) (3)
| 1 | Gets the world size, that is, the total number of process ranks. |
| 2 | Gets the rank of the process the code is running on. |
| 3 | Prints out the size and current rank. |
Running this with 4 process ranks (mpirun -n 4 python hello_world.py
Hello, World! I am process 2 of 4
Hello, World! I am process 1 of 4
Hello, World! I am process 0 of 4
Hello, World! I am process 3 of 4| The output may be more mixed together than the above example as each process writes it output concurrently. |
In a more ABM flavored example, assuming 4 ranks, the following code creates 10 agents on each rank, for a total of 40 agents.
1
2
3
for i in range(10):
agent = MyAgent()
...
These agents are said to be local to the ranks on which they are created. In order to stitch these individual ranks into a global whole, Repast4Py uses the concept of a non-local, ghost agent: a copy of an agent from another rank that local agents can interact with. Repast4Py provides the functionality to create these ghosts and keep their state synchronized from the ghosts' local ranks to the ranks on which they are ghosted. Ghosts are also used to create projections, such as a network or grid that span across process ranks.
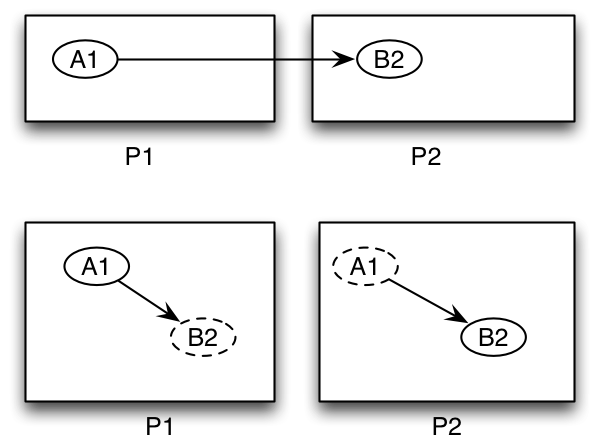
Figure 1 illustrates how ghosts are used in a network projection. The top part of the figure shows that agent A1 is local to process 1 and has
a directed netework link to agent B2, which is local to process 2. Presumably, some aspect of the agent’s behavior is conditional
on the network link, for example checking some attribute of its network neighbors and responding
accordingly. Given that B2 is on a different process there is no way for A1 to
query B2. However, the bottom part of the figure shows how ghost agents are used to tie the network together. B2 is
copied to process 1 where a local link is created between it and A1. A1 can now query the state of B2.
Similarly, a ghost of A1 is copied to process 2 where B2 can now interact with it.
| The copying and synchronization of ghosts agent and ghost agent state is performed by Repast4Py. The user only needs to provide a minimal amount of code to handle the saving and restoring of agent state. This is described in more detail in subsequent sections. |
| Do not update the state of non-local ghost agents. They only exist to be seen by local agents and objects. Any state changes to any agent must be performed on the agent’s local process. The SharedContext component makes a clear distinction between the two types of agents, allowing you to work with only the local agents. |
Spatial projections such as a grid or continuous space are stitched together through the use of buffers and ghosts agents.
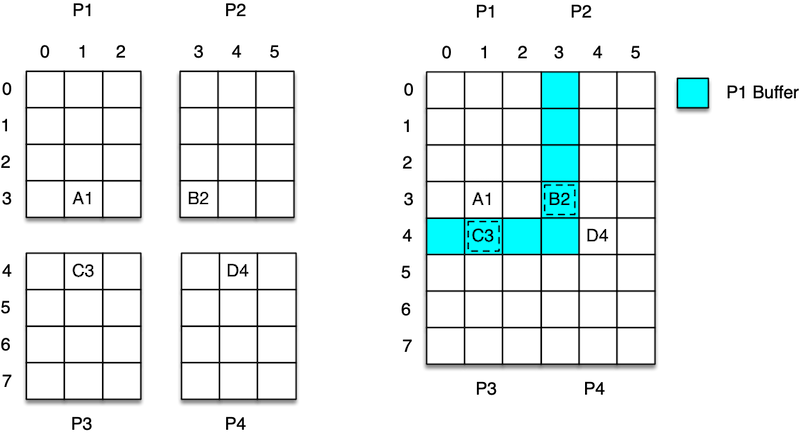
This is illustrated in Figure 2, where the full 6x8 grid is distributed across 4 process ranks. Each rank is responsible for
its own 3x4 quarter of the global grid (left hand side of Figure 2).
On the right hand side, we see how the quarters are stitched together. Each subsection
of the grid contains a buffer that is a copy of the contents of the adjacent subsections.
The blue part of the image is the area for process 1’s grid subsection. There, we can
see the ghost agents C3 and B2 copied from processes 3 and 2 respectively. In this way,
agent A1 can see and interact with agents C3 and B2.
| Be sure to specify a buffer size appropriate for agent behavior. For example, if an agent can see 3 units away and take some action based on what it perceives, then the buffer size should be at least 3, ensuring that an agent can properly see beyond the borders of its own local area. |
Agents can, of course, move around grids and continuous spaces. When an agent moves beyond the borders of its local subsection then it is moved from that rank to the rank of the new subsection to which it has moved. For example, if in Figure 2, agent D4 moves from grid coordinate 4,4 to 4,2 then it will be moved during Repast4Py’s synchronization phase to process 2 where it becomes local
to that process. Cross-process movement and synchronization will be discussed more in the next sections.
When working with Repast4Py’s continuous space (an N-dimensional cartesian space where agents can occupy locations defined by a continuous floating point coordinate), use the tree_threshold parameter to tune
the speed of the search for agents within the buffered area. This search occurs whenever the buffer is refreshed
during synchronization. The continuous space uses a tree (quad or oct depending on the number of dimensions) to efficiently determine which agents are within the buffered region.
Each node in the tree represents an area of the continuous space and contains the point locations of agents within that area. A spatial query, such as that used to find agents in the buffered region, first determines which nodes of the
tree intersect the queried area, and then which points / agents in those nodes intersect the queried area. In this way,
the buffer’s spatial query does not have to iterate through all the occupied points in a continuous space, a potentially time
consuming operation, when updating the buffer areas. The tree_threshold parameter specifies the maximum number of unique points in a spatial index tree node. When this number is reached, the node splits and the points are redistributed among the node’s children. When specifing a tree_threshold, the intention is to lower the number of points / agents that need to be evaluated in a spatial query while balancing that against the overhead it takes to split the tree nodes. A value of 100 is probably a reasonable starting point, but experimenting with different values is encouraged.
|
4. Cross-Process Code Requirements
We’ve seen in the Distributed Simulation section how ghost agents (non-local copies) are used to stitch a simulation together across processes and that when agents move out of their local grid or continuous space subsection they are moved to the process responsible for the destination subsection. While much of this is handled internally by Repast4Py, this section describes in more detail the code the user needs to provide in order for moving and copying to work correctly. We will use examples from the Zombies and Rumor demonstration models. See the Repast4Py Examples page to download the source code for these models and for more information on getting started with the examples.
4.1. Agent ID
For moving and copying agents across processes to work each agent must have a unique id. This id has three components:
-
An integer that uniquely identifies the agent on the rank on which it was created
-
An integer that identifies its type
-
The integer rank on which the agent was created
Combining the first component with the last allows us to uniquely identify an agent across the multi-process simulation while the second allows us to create agents of the appropriate type when they are copied between ranks.
In order to ensure that all agents in Repast4Py have an agent id, all agents must inherit from the
repast4py.core.Agent class which requires these components in its constructor. For example, in the
Zombies demonstration model, the Human agents are subclasses of the repast4py.core.Agent.
1
2
3
4
5
6
7
8
9
10
11
12
13
class Human(repast4py.core.Agent): (1)
"""The Human Agent
Args:
a_id: a integer that uniquely identifies this Human on its
starting rank
rank: the starting MPI rank of this Human.
"""
ID = 0
def __init__(self, a_id: int, rank: int):
super().__init__(id=a_id, type=Human.ID, rank=rank) (2)
| 1 | Human inherits from repast4py.core.Agent |
| 2 | Calling the repast4py.core.Agent constructor with the agent id
components. |
The components as well as the full unique id are accessible as
attributes of the repast4py.core.Agent class.
-
id: the id component from the agent’s unique id
-
type: the type component from the agent’s unique id
-
rank: the rank component from the agent’s unique id
-
uid: the unique id tuple (id, type, rank)
1
2
3
4
5
6
7
8
9
>>> h = Human(12, 3)
>>> h.id
12
>>> h.rank
4
>>> h.type
0
>>> h.uid
(12, 0, 4)
All agents must subclass repast4py.core.Agent. See the API documenation for repast4py.core.Agent for more details of the Agent class.
|
4.2. Saving and Restoring Agents
Moving or copying an agent between processes consists of saving the agent state, moving / copying that state
to another process, and then restoring the agent state as an agent on the destination process. For this to work, each
agent is required to implement a save method that returns a tuple containing the full agent state. The first element of this
full state tuple is the agent’s unique id, itself a tuple (accessed via the uid attribute), and the second
is the dynamic state of that agent. For example, in the Zombie
demonstration model the state of each Human is represented by two variables:
-
infected: a boolean that indicates whether or not the Human is infected
-
infected_duration: an integer tracking how long the agent has been infected
The save method creates a tuple consisting of these two variables and the unique id tuple.
1
2
3
4
5
6
7
8
9
def save(self) -> Tuple:
"""Saves the state of this Human as a tuple.
Used to move this Human from one MPI rank to another.
Returns:
The saved state of this Human.
"""
return (self.uid, self.infected, self.infected_duration)
The agent state in the tuple returned from save can also consist of other tuples, lists
and so on, in addition to primitive values, as long as the unique id tuple is the first element.
|
All agents must implement a save method.
|
You must also provide a restore function that takes the tuple produced by the save method and
returns an agent either created from or updated with that state. The function is used during synchronization
to create the agents on the destination ranks. In the Zombies demonstration model, the restore_agent
function, when given agent state, returns Human and Zombie agents. It uses a caching scheme
to avoid re-instantiating agents that have previously been created on a rank, and updates the
state of those previously created agents. This can be a useful performance improvement at the
expense of using more memory.
1
2
3
4
5
6
7
8
9
10
11
12
13
14
15
16
17
18
19
20
21
22
23
24
25
26
27
28
29
30
31
32
33
34
35
36
37
38
39
40
41
agent_cache = {} (1)
def restore_agent(agent_data: Tuple): (2)
"""Creates an agent from the specified agent_data.
This is used to re-create agents when they have moved from one MPI rank
to another. The tuple returned by the agent's save() method is moved
between ranks and create_agent is called for each tuple in order
to create the agent on that rank. Here we also use
a cache to store any agents already created on this rank,
and only update their state rather than recreating them from scratch.
Args:
agent_data: the data from which to create the agent. This is the tuple
returned from the agent's save() method where the first
element is the agent id tuple, and any remaining
arguments encapsulate agent state.
"""
uid = agent_data[0] (3)
# in uid element 0 is id, 1 is type, 2 is rank
if uid[1] == Human.ID: (4)
if uid in agent_cache: (5)
h = agent_cache[uid]
else:
h = Human(uid[0], uid[2])
agent_cache[uid] = h
# restore the agent state from the agent_data tuple
h.infected = agent_data[1] (6)
h.infected_duration = agent_data[2]
return h
else: (7)
# note that the zombie has no internal state
# so there's nothing to restore other than
# the Zombie itself
if uid in agent_cache:
return agent_cache[uid]
else:
z = Zombie(uid[0], uid[2])
agent_cache[uid] = z
return z
| 1 | Cache for previously instantiated agents. Key is an agent’s unique id (uid) tuple and value is the agent. |
| 2 | agent_data is a tuple of the format produced by the save method. For Humans this is (uid, infected,
infected_duration). For Zombies, this is just (uid). |
| 3 | The first element of the agent_data tuple is the uid tuple. The uid tuple is (id, type, starting rank). |
| 4 | Checks if the agent is a Human or Zombie, using the type component of the uid. |
| 5 | Checks if the agent is already cached, if so then get it (line 23), otherwise create a new Human agent
(line 25). |
| 6 | Updates the cached / created Human with the passed in agent state. |
| 7 | agent_data is for a Zombie so search cache and if necessary create a new one. |
Lastly, in a distributed network, agents are not typically moved between processes
but rather the ghost agents remain on a process once the network is created. Repast4Py tracks
these ghost agents and does not recreate the agents every synchronization step via a restore
method, instead a state update is sent to the appropriate ghost agents. In that case, an agent’s update
method is called to handle the state update. The Rumor demonstration model has an example of this.
1
2
3
4
5
6
7
8
9
10
11
12
13
class RumorAgent(core.Agent):
...
def update(self, data: bool): (1)
"""Updates the state of this agent when it is a ghost
agent on some rank other than its local one.
Args:
data: the new agent state (received_rumor)
"""
...
self.received_rumor = data
| 1 | Updates ghost agent state from saved agent state. Here the data argument
is only the dynamic state element of the tuple returned from the agent’s save method, namely,
the self.received_rumor bool from (self.uid, self.received_rumor). |
4.3. Synchronization
As mentioned in the Distributed Simulation section, each process in a
Repast4Py application runs in a separate memory space from all the other processes. Consequently,
we need to synchronize the model state across processes by moving agents, filling
projection buffers with ghosts, and updating ghosted states, as necessary. Synchronization
is performed by calling the
SharedContext.synchronizemethod and passing it your restore function.
The synchronization method will use the agent save method(s) and your restore function
to synchronize the state of the simulation across its processes.
5. Tutorial 1 - A Simple Random Walk Model
This tutorial will guide you through coding a simple model, focusing on components and concepts common to every model. The simulation itself consists of a number of agents moving at random around a two-dimensional grid and logging the aggregate and agent-level colocation counts. Each timestep the following occurs:
-
All the agents (walkers) choose a random direction and move one unit in that direction.
-
All the agents count the number of other agents they meet at their current location by determining the number of colocated agents at their grid locations.
-
The sum, minimum, and maxiumum number of agents met are calculated across all process ranks, and these values are logged as the total, minimum, and maximum
meetvalues.
In addition, every 10 timesteps:
-
The individual agent meet counts are logged across all the process ranks.
See the Repast4Py Examples page to download the source code for this model and for more information on getting started with the examples.
The code consists of the following components:
-
A
Walkerclass that implements the agent state and behavior. -
A
Modelclass responsible for initialization and managing the simulation. -
A
restore_walkerfunction used to create an individualWalkerwhen thatWalkerhas moved (i.e., walked) to another process. -
A
runfunction that creates and starts the simulation. -
An
if name == "main"block that allows the simulation to be run from the command line.
| This is the canonical way to organize a Repast4Py simulation: agents implemented as classes, a model-type class to initialize and manage the simulation, a function to handle restoring agents as they move between processes, and some additional code to run the simulation from the command line. O f course, in a more complex simulation the responsibilities and behavior of the agent and model classes can be factored out into additional classes, functions, and modules as necessary, but the overall organization remains the same. |
5.1. The Walker Agent
The Walker class implements our Walker agent, encapsulating its:
-
State: a count of all the other walkers that it has colocated with, and the walker’s current location
-
Behavior: moving randomly around a 2D dimensional grid and counting the number of colocations
As required for all Repast4Py agent implementations, the Walker class subclasses
repast4py.core.Agent, passing it the components of the unique agent id tuple.
1
2
3
4
5
6
7
8
9
10
11
12
13
from repast4py.space import DiscretePoint
from repast4py import core
import numpy as np
class Walker(core.Agent): (1)
TYPE = 0 (2)
OFFSETS = np.array([-1, 1]) (3)
def __init__(self, local_id: int, rank: int, pt: DiscretePoint):
super().__init__(id=local_id, type=Walker.TYPE, rank=rank) (4)
self.pt = pt
self.meet_count = 0
| 1 | Walker subclasses repast4py.core.Agent. Subclassing Agent is a requirement for all Repast4Py agent implementations. |
| 2 | TYPE is a class variable that defines an agent type id for our walker agent. This is a required
part of the unique agent id tuple (see 4). |
| 3 | OFFSETS is a numpy array used in the agent behavior implementation to select the direction to move in. See the discussion of the walk method below. |
| 4 | repast4py.core.Agent constructor takes 3 arguments: an integer id that uniquely identifes an
agent on the process where it was created, a non-negative integer identifying the type of the agent, and
the rank on which the agent is created. Taken together, these three uniquely identify the agent
across all ranks in the simulation. |
The agent’s behavior is implemented in the walk and the count_colocations methods.
In the walk method, the agent randomly chooses an offset from its current location (self.pt),
adds those offsets to its current location to create a new location, and then moves to that new
location on the grid. The moved-to-location becomes the agent’s new current location.
5.1.1. Walking the Walker
1
2
3
4
5
6
7
8
9
10
11
12
from repast4py import random (1)
from repast4py.space import DiscretePoint
...
OFFSETS = np.array([-1, 1])
...
def walk(self, grid: SharedGrid): (2)
# choose two elements from the OFFSET array
# to select the direction to walk in the
# x and y dimensions
xy_dirs = random.default_rng.choice(Walker.OFFSETS, size=2) (3)
self.pt = grid.move(self, DiscretePoint(self.pt.x + xy_dirs[0],
self.pt.y + xy_dirs[1], 0)) (4)
| 1 | repast4py.random contains an instance of a numpy.random.Generator as the module level variable
default_rng, as well as a function for intializing this variable. See the numpy random.Generator api reference for more details. |
| 2 | All the walker agents move on the same grid. An instance of this grid, a repast4py.space.SharedGrid object is passed in. |
| 3 | The numpy.random.Generator.choice randomly chooses size number of elements
from a numpy array. In this case randomly selecting either -1 or 1 from OFFSETS. The
two chosen values correspond to the direction to move along the x and y dimensions, respectively. |
| 4 | SharedGrid.move moves an agent to a location in the grid and returns the destination location. Grid locations are represented by a repast4py.space.DiscretePoint and an instance of
that with updated new x and y coordinates is passed to the move method. |
Repast4Py provides a default random number generator in repast4py.random.default_rng. This
random number generator is initialized when the module is imported, with the current time as the seed.
The seed can also be set by specifying a random.seed model input parameter and using Repast4Py’s model input parameters utility code. (See Running the Simulation for more details.) random.default_rng is an instance of numpy.random.Generator. See the numpy random.Generator api reference for more information on the available distributions and sampling functions.
|
5.1.2. Logging the Walker
The count_colocations method gets the number of other agents at the current location, and
updates both the agent’s individual running total of other agents met, as well as a MeetLog dataclass
instance that is used to log the total number of meets and the minimum and maximum.
1
2
3
4
5
6
7
8
9
10
11
12
13
14
15
16
17
@dataclass
class MeetLog:
total_meets: int = 0
min_meets: int = 0
max_meets: int = 0
...
def count_colocations(self, grid: SharedGrid, meet_log: MeetLog):
# subtract self
num_here = grid.get_num_agents(self.pt) - 1 (1)
meet_log.total_meets += num_here
if num_here < meet_log.min_meets:
meet_log.min_meets = num_here
if num_here > meet_log.max_meets:
meet_log.max_meets = num_here
self.meet_count += num_here
| 1 | SharedGrid.get_num_agents returns the number of agents at a specified location. |
To learn more about built-in agent and grid functionality, see the
API documentation for repast4py.core.Agent
and repast4py.space.SharedGrid.
|
As we will see below, the Model class will schedule the execution of these two functions on every agent at every timestep. In this way, each agent executes its behavior each timestep.
5.1.3. Serializing the Walker
When a Walker walks beyond the bounds of the local grid managed by its current
process rank, or when populating the buffer area of the local grid sections,
Repast4Py needs to serialize the Walker state to a tuple, which is then used
to recreate that Walker on a different process. The Walker.save method
performs this serialization, saving the agent’s unique id, its current meet count,
and location.
1
2
3
4
5
6
7
def save(self) -> Tuple:
"""Saves the state of this Walker as a Tuple.
Returns:
The saved state of this Walker.
"""
return (self.uid, self.meet_count, self.pt.coordinates) (1)
| 1 | Returns the Walker state as a tuple. The first element of this
tuple MUST be the agent’s unique id (self.uid). self.pt is
an instance of a DiscretePoint whose coordinates method
returns the point’s coordinates as a numpy array. |
Every agent must implement a save method that returns the
state of the agent as a tuple. The first element of this
tuple MUST be the agent’s unique id (self.uid). The remaining elements
should encapsulate any dynamic agent state.
|
5.2. The Model Class
The Model class encapsulates the simulation and is responsible for initialization. It schedules events,
creates agents and the grid the agents inhabit, and manages logging. In addition, the scheduled events
that drive the simulation forward are methods of the Model class.
In the Model constructor, we create the simulation schedule, the context that holds
our agents, the grid on which they move, the agents themselves, and the loggers that
we use to log various simulation statistics to files. We begin with the constructor
signature, and the schedule runner creation.
5.2.1. Scheduling Events
The SharedScheduledRunner class encapsulates a dynamic schedule of executable events shared and synchronized across processes. Events are added to the schedule for execution at a particular tick. The first valid tick is 0. Events will be executed in tick order, earliest before latest. When multiple events are scheduled for the same tick, the events' priorities will be used to determine the order of execution within that tick. If during the execution of a tick, an event is scheduled before the executing tick (i.e., scheduled to occur in the past) then that event is ignored. The schedule is synchronized across process ranks by determining the global cross-process minimum next scheduled event time and executing events for that time. In this way, no schedule runs ahead of any other. In practice an event is a Python function or method.
1
2
3
4
5
6
7
8
def __init__(self, comm: MPI.Intracomm, params: Dict): (1)
# create the schedule
self.runner = schedule.init_schedule_runner(comm) (2)
self.runner.schedule_repeating_event(1, 1, self.step) (3)
self.runner.schedule_repeating_event(1.1, 10, self.log_agents)
self.runner.schedule_stop(params['stop.at']) (4)
# once initialized the schedule runner can be accessed with schedule.runner
schedule.runner().schedule_end_event(self.at_end) (5)
| 1 | The Model constructor takes an MPI communicator and a dictionary of model input parameters as arguments. |
| 2 | Before any events can be scheduled, the schedule runner must be initialized. |
| 3 | Schedules Model.step on this instance of the model to execute starting at tick 1 and then every
tick thereafter. Repeating events are scheduled with schedule.repeating_event. The first argument
is the start tick, and the second is the frequency for repeating. |
| 4 | schedule_stop schedules the tick at which the simulation should stop. At this tick,
events will no longer be popped off the schedule and executed. |
| 5 | schedule_end_event can be used to schedule methods that perform some sort of
clean up type operation when the simulation ends, closing a log file, for example.
This is called at the time specified in the call to schedule_stop. |
Once the default scheduler runner has been initialized with schedule.init_schedule_runner, you can get a reference to it with schedule.runner(). See the schedule module
API documentation for
more information on different ways to schedule events (methods and functions).
|
A simulation stopping time must be set with schedule_stop. Without a stopping time
the simulation will continue to run, seeming to hang if there are no events to execute, or
continuing to execute any scheduled events without stopping. The stopping time does not
need to be set during initialization, but can be set during a simulation run when a
stopping condition is reached.
|
By default events are scheduled with a random priority type, meaning that events scheduled for the same tick will be executed in random order. Other priority types are available though:
-
PriorityType.FIRST- events will execute before those with other PriorityTypes. All events with aFIRSTpriority type will execute in the order in which they are scheduled with respect to otherFIRSTpriority type events. -
PriorityType.RANDOM- events will execute in a random order, after theFIRSTpriority type events, and before theLASTpriority type events. If there areBY_PRIORITYevents scheduled for the same tick asRANDOMevents, theRANDOMevents will be shuffled at random into the orderedBY_PRIORITYevents. -
PriorityType.BY_PRIORITY- events will execute in the order specified by an additional priority parameter (lower values are higher priority), and after anyFIRSTpriority events and before anyLASTpriority events. If there areRANDOMpriority events scheduled for the same tick asBY_PRIORITYevents, those will be shuffled at random into the orderedBY_PRIORITYevents. -
PriorityType.LAST- events will execute after those with other priority types. All events with aLASTpriority type will execute in the order in which they are scheduled with respect to otherLASTpriority type events.
An event’s PriorityType and optional priority can specified via the scheduling methods (e.g.,
schedule_repeating_event). See the schedule module
API documentation for
more information on different ways to schedule events (methods and functions).
5.2.2. Creating the Context and Grid
Once the schedule has been initialized and events have been added, the context, which holds the population of agents, and the grid projection on which the agents move are created (contexts and projections are described in Contexts and Projections).
1
2
3
4
5
6
7
8
9
10
11
12
13
14
from repast4py import context as ctx
...
# create the context to hold the agents and manage cross process
# synchronization
self.context = ctx.SharedContext(comm) (1)
# create a bounding box equal to the size of the entire global world grid
box = space.BoundingBox(0, params['world.width'], 0, params['world.height'], 0, 0) (2)
# create a SharedGrid of 'box' size with sticky borders that allows multiple agents
# in each grid location.
self.grid = space.SharedGrid(name='grid', bounds=box, borders=space.BorderType.Sticky,
occupancy=space.OccupancyType.Multiple,
buffer_size=2, comm=comm) (3)
self.context.add_projection(self.grid) (4)
| 1 | Creates the SharedContext for this
simulation. The SharedContext contains the population of agents and manages
synchronization of the projections across ranks. |
| 2 | A BoundingBox is used to initialize the size of Repast4Py’s cartesian spaces. Its
arguments are the minimum x coordinate, the extent of the x dimension, and then the same for
the y and z dimensions. Here we create a 2D box (the z extent is 0) starting at (0,0) and
extending for params['world.width] in the x dimension and params['world.height'] in
the y dimension. |
| 3 | space.SharedGrid takes a name, its bounds, its border, and occupancy types, as well
as a buffer size, and a communicator as arguments. See the SharedGrid
API documentation
for a description of these arguments. The concept of a buffer was described in the
Distributed Simulation section. |
| 4 | Once a projection has been created it must be added to the context so that it can be properly synchronized across processes. |
5.2.3. Creating the Agents
When creating the agents, we create the number of Walker agents specified in the walker.count
input parameter, assigning each a random location.
1
2
3
4
5
6
7
8
rank = comm.Get_rank()
for i in range(params['walker.count']):
# get a random x,y location in the grid
pt = self.grid.get_random_local_pt(rng) (1)
# create and add the walker to the context
walker = Walker(i, rank, pt) (2)
self.context.add(walker) (3)
self.grid.move(walker, pt) (4)
| 1 | Gets random location within the grid’s local bounds. Each rank is responsible for some subsection of the
total global grid and get_random_local_pt gets a random location within those local bounds. |
| 2 | Creates the Walker, passing it an id, its starting rank, and its current location. See Section 5.1, “The Walker Agent” for more. |
| 3 | Adds the new Walker to the context. Once created, an agent must be added to the context in order to be properly synchronized and iterated through as part of the agent population. |
| 4 | Move the walker to its starting location. |
Agents added to a context are also added to any projections in that context. Although
projections have add methods for adding agents, these are typically NOT used in a
simulation.
|
5.2.4. Initializing Logging
Logging refers to gathering simulation output data and writing it to a file. There are two types of logging supported by Repast4Py.
-
Tabular logging in which the user supplies row values to be logged, and Repast4Py concatenates these rows across processes and writes them to a file. This is useful for logging events and individual agent attributes. See the
repast4py.logging.TabularLoggerAPI for more information. -
Reduce-type logging where the user supplies the aggregate values to be logged in the form of a Python
dataclasses.dataclassand Repast4Py performs a cross-process reduce-type (e.g., summation) operation on those values. To use this type of logging, you create a logger, which is responsible for logging the dataclass field(s) and performing the reduction operation on the field(s). These loggers are then added to alogging.ReducingDataSet. Callinglogging.ReducingDataSet.log(tick)will log the current value of the dataclass field(s) in the loggers and perform the cross-process reduction. See theloggingmodule API documentation for more information.
The Walker Model uses both of these logging types. The first is used to log the individual meet_count of each agent, and the second to log that total number of meets, as well as the minimum and maximum number.
1
2
3
4
5
6
7
8
9
10
11
12
13
14
15
16
17
18
19
@dataclass
class MeetLog: (1)
total_meets: int = 0
min_meets: int = 0
max_meets: int = 0
...
self.agent_logger = logging.TabularLogger(comm, params['agent_log_file'],
['tick', 'agent_id', 'agent_uid_rank',
'meet_count']) (2)
self.meet_log = MeetLog() (3)
loggers = logging.create_loggers(self.meet_log, op=MPI.SUM,
names={'total_meets': 'total'}, rank=rank) (4)
loggers += logging.create_loggers(self.meet_log, op=MPI.MIN,
names={'min_meets': 'min'}, rank=rank) (5)
loggers += logging.create_loggers(self.meet_log, op=MPI.MAX,
names={'max_meets': 'max'}, rank=rank) (6)
self.data_set = logging.ReducingDataSet(loggers, MPI.COMM_WORLD,
params['meet_log_file']) (7)
| 1 | MeetLog is the dataclass used by the aggregate reduce logging. As we saw in
Section 5.1.2, “Logging the Walker” each agent updates the shared MeetLog instance as appropriate in
its count_colocations method. |
| 2 | The TabularLogger class is used for tabular-style logging. The constructor
arguments are the communicator over which to concatenate all the table’s rows and
the column header values. self.agent_logger is then used to log the individual
agent meet counts. |
| 3 | Creates the MeetLog object that contains the aggregate colocation statistics
that we want to log. |
| 4 | Creates a logger that uses self.meet_log as the source of the data to log,
performing a cross process summation (op=MPI.SUM) of that data to log, and logs the value
of the total field in self.meet_log. The names argument specifies
the fields to log as a dictionary where the key is the dataclass field to log, and
the value is the column header text for that value. |
| 5 | Creates a logger for the self.meet_log.min field, minimizing the value
across processes. The created logger is added to the list of loggers created
in 4. |
| 6 | Creates a logger for the self.meet_log.max field, maximizing the value
across processes. The created logger is added to the list of loggers created
in 4. |
| 7 | Creates a logging.ReducingDataSet from the list of loggers. params['meet_log_file]
is the name of the file to log to. |
After the logging is initialized, we log the starting tick 0 state of the simulation.
1
2
3
4
5
6
# count the initial colocations at time 0 and log
for walker in self.context.agents():
walker.count_colocations(self.grid, self.meet_log) (1)
self.data_set.log(0) (2)
self.meet_log.max_meets = self.meet_log.min_meets = self.meet_log.total_meets = 0 (3)
self.log_agents() (4)
| 1 | Updates self.meet_log with each agents colocation data by calling count_colocations
on each agent. See Section 5.1.2, “Logging the Walker” for the details. |
| 2 | Logs the current values of the self.meet_log by calling log on the self.data_set ReducingDataSet.
The log method takes a floating point argument that specifies the tick at which the data was logged (in this case tick 0). |
| 3 | Resets the self.meet_log values back to 0 given that we want to log the data per tick, rather than a running total. |
| 4 | Logs the individual agent meet counts. See the method definition below. |
The log_agents method logs each agent’s meet_count using the
self.agent_logger TabularLogger.
1
2
3
4
5
6
7
def log_agents(self):
tick = self.runner.schedule.tick (1)
for walker in self.context.agents(): (2)
self.agent_logger.log_row(tick, walker.id, walker.uid_rank,
walker.meet_count) (3)
self.agent_logger.write() (4)
| 1 | Gets the current tick value |
| 2 | Iterates over all the local agents in the context. SharedContext.agents() returns
an iterator over the local agent population. |
| 3 | For each Walker, log the current tick, the Walker’s id, its unique id rank,
and its meet_count using the log_row method. Each call to log_row becomes
a row in the tabular output. |
| 4 | Writes the currently logged rows to a file. It is not strictly necessary
to call write every time rows are logged as the rows will accumulate until write
is eventually called. |
5.2.5. Scheduled Methods
In Section 3.2, “Scheduling Events” we saw how to schedule events that repeat and that execute
when the simulation ends. In this model, the events to be scheduled are methods of the
Model class. The methods are called according to how they are scheduled, driving the
simulation forward. The first of these, the step method, is scheduled to execute starting
at tick 1 and then every tick thereafter.
1
2
3
4
5
6
7
8
9
10
11
12
13
14
# scheduled with: self.runner.schedule_repeating_event(1, 1, self.step)
def step(self):
for walker in self.context.agents(): (1)
walker.walk(self.grid)
self.context.synchronize(restore_walker) (2)
for walker in self.context.agents(): (3)
walker.count_colocations(self.grid, self.meet_log)
tick = self.runner.schedule.tick
self.data_set.log(tick) (4)
# clear the meet log counts for the next tick
self.meet_log.max_meets = self.meet_log.min_meets = self.meet_log.total_meets = 0 (5)
| 1 | Calls walk on each Walker agent. self.context.agents returns an iterator over all the
agents in the model. See Section 5.1.1, “Walking the Walker” for more information on the walk method,
and the SharedContext
API documenation
for more information on the agents method. |
| 2 | Synchronizes the state of the simulation across processes using the restore_walker
function to restore any Walkers that have moved processes. See Section 5.3, “Restoring Walkers”
for more information. |
| 3 | Updates self.meet_log with each agent’s colocation data by calling count_colocations
on each Walker. See Section 5.1.2, “Logging the Walker” for the details. |
| 4 | Logs the current values of the self.meet_log by calling log on the self.data_set ReducingDataSet.
As we saw earlier, the log method takes a floating point argument that specifies the tick at which the data was logged.
In this case, we use the current tick value. |
| 5 | Resets the self.meet_log values back to 0 because we want to log the data per tick, rather than
a running total. |
Call synchronize on your SharedContext whenever you need to synchronize
the state of the simulation across processes. For example, when agents moving on a
grid or space may have crossed into a subsection of the global grid that is
managed by a different process or when the buffer areas need to be updated.
|
The second repeating event (self.runner.schedule_repeating_event(1.1, 10, self.log_agents)) is
scheduled to call Model.log_agents starting at tick 1.1, and then every 10 ticks thereafter. See the discussion
of log_agents in Section 5.2.4, “Initializing Logging” for more information.
The final event (self.runner.schedule_end_event(self.at_end)) is scheduled to call
Model.at_end when the simulation ends. This method closes the two logs,
insuring that any remaining unwritten data is written to their respective
files.
1
2
3
def at_end(self):
self.data_set.close()
self.agent_logger.close()
Do not forget to call close on your logging class instances when the simulation ends.
|
5.3. Restoring Walkers
The restore_walker function is used to create an individual Walker when that
Walker has moved (i.e., walked) to another process. This function is passed
to the synchronize method (i.e., self.context.synchronize(restore_walker))
and is called in the synchronization mechanism. The restore_walker function
is the reverse of the Walker.save method discussed in Section 5.1.3, “Serializing the Walker”,
unpacking the tuple returned by that to create a Walker agent.
1
2
3
4
5
6
7
8
9
10
11
12
13
14
15
16
17
18
19
20
21
walker_cache = {} (1)
def restore_walker(walker_data: Tuple): (2)
"""
Args:
walker_data: tuple containing the data returned by Walker.save.
"""
# uid is a 3 element tuple: 0 is id, 1 is type, 2 is rank
uid = walker_data[0] (3)
pt_array = walker_data[2]
pt = DiscretePoint(pt_array[0], pt_array[1], 0) (4)
if uid in walker_cache: (5)
walker = walker_cache[uid]
else: (6)
walker = Walker(uid[0], uid[2], pt)
walker_cache[uid] = walker
walker.meet_count = walker_data[1] (7)
walker.pt = pt
return walker
| 1 | We use a caching strategy when restoring Walkers. This dictionary is the cache of previously created walkers. The dictionary keys are the Walker unique ids, and the values are the Walker instances. |
| 2 | The walker_data tuple is the same tuple as created by the Walker.save
method. |
| 3 | The first element of the tuple is the Walker’s unique id. |
| 4 | Creates a DiscretePoint from point coordinate array. This
is the current location of the Walker being restored. |
| 5 | Checks if the Walker unique id is in the cache. If it is, then retrieve that Walker. |
| 6 | If the unique id is not in the cache, then create a Walker. |
| 7 | Updates the Walker state with the meet_count and point
data. |
5.4. Running the Simulation
The simulation is run from the command line:
mpirun -n 4 python examples/rndwalk/rndwalk.py examples/rndwalk/random_walk.yaml
Here we are running the simulation with 4 process ranks and the model input parameters are
in the examples/rndwalk/random_walk.yaml file.
1
2
3
4
5
6
7
random.seed: 42
stop.at: 50
walker.count: 1000
world.width: 2000
world.height: 2000
meet_log_file: 'output/meet_log.csv'
agent_log_file: 'output/agent_log.csv'
5.4.1. Parsing Input Parameters
An if name == 'main' code block is used to parse the input parameters and
run the simulation. The repast4py.parameters module contains utility functions
for parsing both command line and model input parameter files, including a
default parser for command line arguments.
1
2
3
4
5
if __name__ == "__main__":
parser = parameters.create_args_parser() (1)
args = parser.parse_args() (2)
params = parameters.init_params(args.parameters_file, args.parameters) (3)
run(params)
| 1 | Creates the default command line argument parser. |
| 2 | Parses the command line into its arguments using that default parser |
| 3 | Creates the model input parameters dictionary from those arguments using
parameters.init_params. |
The default command line parser created with parameters.create_args_parser accepts
a path to a yaml format parameters input file, and a json format dictionary string
that will override parameters in the parameters file.
$ python examples/rndwalk/rndwalk.py -h
usage: rndwalk.py [-h] parameters_file [parameters]

positional arguments:
  parameters_file  parameters file (yaml format)
  parameters       json parameters string

optional arguments:
  -h, --help       show this help message and exit
parameters.init_params takes the parameters file and the json string and creates a dictionary
of model input parameters whose keys are the parameter names and values are the parameter values.
This dictionary is returned by the function and is available via the module itself as parameters.params.
For example,
1
2
3
4
5
from repast4py import parameters
...
parameters.init_params(args.parameters_file, args.parameters)
...
num_agents = parameters.params['num.agents']
If the parameters file or the json input contains a parameter named random.seed,
the default random number generator (i.e., repast4py.random.default_rng) is initialized
with that seed. See the repast4py.parameters
API documentation for more information.
Lastly we have a simple run function that creates the Model class and calls its
start method, which starts the simulation by starting schedule execution. This run function is called
in the if name == 'main' code block.
1
2
3
4
5
6
7
8
def run(params: Dict):
model = Model(MPI.COMM_WORLD, params)
model.start()
class Model:
def start(self):
self.runner.execute() (1)
| 1 | Start the simulation by executing the schedule which calls the scheduled methods at the appropriate times and frequency. |
The code in the run function could be moved to the if name == 'main' code block,
but it is often useful to have an entry type function that initializes and starts a simulation.
|
6. Tutorial 2 - The Rumor Network Model
6.1. Overview
The Rumor model is a simple network model that illustrates Repast4Py’s network agent-based model features. The simulation models the spread of a rumor through a networked population. During initialization some number of agents (network nodes) are marked as rumor spreaders. At each iteration of the simulation, a random draw is made to determine if the neighbors of any rumor-spreading nodes have received the rumor. This draw is performed once for each neighbor. After all of the neighbors that can receive the rumor have been processed, the collection of rumor spreaders is updated to include those nodes that received the rumor.
This text assumes you have already read the Repast4Py Users Guide up through Tutorial 1.
See the Repast4Py Examples page to download the source code for this model and for more information on getting started with the examples.
6.2. The Network
The Rumor model network is initialized from the examples/rumor/network.txt file included with the example model.
This file assigns each network node, corresponding to each model agent,
to a process rank. Repast4Py creates a repast4py.network.SharedNetwork
from this file, instantiating the agents on the correct ranks and creating the edges between
the agents appropriately. When an edge is between agents on different process ranks Repast4Py will create a ghost agent whose state mirrors that of the agent on the other process, and then create an edge using this ghost. For example, if an edge exists between A and B and A is on rank 1 and B on rank 2, then
Repast4Py will:
-
Create a ghost of
Bon rank 1 -
Create a ghost of
Aon rank 2 -
Create an edge between
Aand the ghostBon rank 1 -
Create an edge between
Band the ghostAon rank 2
For more information about ghost agents and how their state is maintained see the Distributed Simulation and Cross-Process Code Requirements sections.
The network.txt file was created using rumor.generate_network_file to distribute a
connected Watts and Strogatz graph generated by the networkx Python package across 4 process ranks. rumor.generate_network_file
uses Repast4Py’s capability to take a networkx Graph object and distribute it across a specified number of
process ranks and write this distributed network to a file. A model can then create a SharedNetwork instance from this file.
1
2
3
4
5
6
7
8
9
10
11
12
13
14
15
16
17
import networkx as nx
from repast4py.network import write_network, read_network
...
def generate_network_file(fname: str, n_ranks: int, n_agents: int):
"""Generates a network file using Repast4Py.network.write_network.
Args:
fname: the name of the file to write to
n_ranks: the number of process ranks to distribute the file over
n_agents: the number of agents (node) in the network
"""
g = nx.connected_watts_strogatz_graph(n_agents, 2, 0.25) (1)
try:
import nxmetis
write_network(g, 'rumor_network', fname, n_ranks, partition_method='metis') (2)
except ImportError:
write_network(g, 'rumor_network', fname, n_ranks) (3)
| 1 | Creates a connected Watts and Strogatz graph using networkx. See the networkx API Docs for more details. |
| 2 | If the nxmetis package is available, distribute the graph using the metis partition method,
and write it out to fname. |
| 3 | If nxmetis is not available, distribute the graph using the default random partition method,
and write it out to fname. |
See the API documentation for repast4py.network.write_network for more information.
6.3. The Rumor Model Implementation
The Rumor Model implementation follows the typical Repast4Py structure and consists of the following parts.
-
A
RumorAgentclass that implements the agent state and behavior -
A
Modelclass responsible for initialization and managing the simulation -
A
create_rumor_agentfunction used to create the Rumor agents when creating the network from a saved file -
A
restore_agentfunction used to create an individualRumorAgentwhen thatRumorAgenthas been ghosted (i.e., created as a ghost agent) on another process rank -
A
runfunction that creates and starts the simulation -
An
if name == "main"block that allows the simulation to be run from the command line
6.3.1. The Rumor Agent
The Rumor model’s agent is a simple class with a single received_rumor boolean attribute that
specifies whether or not the agent has received the rumor. It also has the canonical save and
update methods used to move and copy the agent between processes and to update the state of a
ghost agent from its originating process rank.
1
2
3
4
5
6
7
8
9
10
11
12
13
14
15
16
17
18
19
20
21
22
23
24
25
26
27
28
29
30
class RumorAgent(core.Agent): (1)
def __init__(self, nid: int, agent_type: int, rank: int, received_rumor=False):
super().__init__(nid, agent_type, rank) (2)
self.received_rumor = received_rumor (3)
def save(self): (4)
"""Saves the state of this agent as a tuple.
A non-ghost agent will save its state using this
method, and any ghost agents of this agent will
be updated with that data (self.received_rumor).
Returns:
The agent's state
"""
return (self.uid, self.received_rumor)
def update(self, data: bool): (5)
"""Updates the state of this agent when it is a ghost
agent on a rank other than its local one.
Args:
data: the new agent state (received_rumor)
"""
if not self.received_rumor and data:
# only update if the received rumor state
# has changed from false to true
model.rumor_spreaders.append(self)
self.received_rumor = data
| 1 | RumorAgent extends repast4py.core.agent as is required by all Repast4Py agents |
| 2 | Calls the core.Agent constructor, passing the node id, agent_type, and originating rank.
Together these will create a globally unique id for this agent. |
| 3 | The received_rumor boolean specifies whether the agent has received the rumor
and is able to spread it. |
| 4 | The required save method for saving the agent’s state as a tuple. This state
can be used to update ghosts of this agent on other ranks. |
| 5 | The required update method for updating ghosts from saved agent state. Here,
we only update if the received_rumor state has changed from False to True. If so,
then add this agent to the Model’s list of rumor spreading agents (Section 6.3.2.2, “Seeding the Rumors”). |
6.3.2. The Model Class
As in Tutorial 1, the Model class encapsulates the simulation. It is responsible for initialization, scheduling events, creating agents and their network, and managing logging. It also defines the scheduled events that drive the simulation forward.
In the Model constructor, we create the simulation schedule,
the network, seed the network with the rumors, and initialize the loggers that
we use to log the rumor counts to a file.
1
2
3
4
5
6
7
8
9
10
from repast4py import core, random, schedule, logging, parameters
...
class Model:
def __init__(self, comm, params):
self.runner = schedule.init_schedule_runner(comm) (1)
self.runner.schedule_repeating_event(1, 1, self.step) (2)
self.runner.schedule_stop(params['stop.at']) (3)
self.runner.schedule_end_event(self.at_end) (4)
...
| 1 | Before any events can be scheduled, the schedule runner must be initialized. |
| 2 | Schedules Model.step to execute starting at tick 1 and then every tick thereafter. Repeating events are scheduled with schedule.repeating_event.
The first argument is the start tick, and the second is the frequency for repeating. |
| 3 | schedule_stop schedules the tick at which the simulation should stop. At this tick,
events will no longer be popped off the schedule and executed. |
| 4 | schedule_end_event can be used to schedule methods that perform some sort of
clean up type operation when the simulation ends, closing a log file, for example.
This is called at the tick specified in schedule_stop. |
Once the default scheduler runner has been initialized with schedule.init_schedule_runner, you can get a reference to it with schedule.runner(). See the schedule model API documentation for
more information on different ways to schedule events (methods and functions).
|
A simulation stopping time must be set with schedule_stop. Without a stopping time
the simulation will continue to run, seeming to hang if there are no events to execute, or
continuing to execute any scheduled events without stopping. The stopping time does not
need to be set during initialization, but can be set during a simulation run when a
stopping condition is reached.
|
Creating the Network
As described in Section 6.2, “The Network” the Rumor model network is initialized
from a file. The repast4py.network.read_network function reads this
file and creates a SharedNetwork instance from the network description
in the file.
1
2
3
4
fpath = params['network_file'] (1)
self.context = ctx.SharedContext(comm) (2)
read_network(fpath, self.context, create_rumor_agent, restore_agent) (3)
self.net = self.context.get_projection('rumor_network') (4)
| 1 | Gets the path to the file describing the network from the parameters dictionary |
| 2 | Creates a context to hold the agents and the network projection |
| 3 | Creates the network from the named file, using the create_rumor_agent, and
restore_agent functions to create the agents and their necessary ghosts (Section 6.3.3, “Creating and Restoring RumorAgents”).
The created network is added to the specified context as part of this call. |
| 4 | Gets a reference to the named network from the context. The network
input file specifies the network name on its first line. This is the
network created in <3> and is an instance of an
UndirectedSharedNetwork. |
Seeding the Rumors
We seed the network with some initial rumor spreaders by selecting a parameterized number of
agents and setting their received_rumor attribute to True. These agents
are added to the Model’s list of rumor spreaders.
1
2
3
4
5
def __init__(self, comm, params):
...
self.rumor_spreaders = []
self.rank = comm.Get_rank()
self._seed_rumor(params['initial_rumor_count'], comm)
The _seed_rumor method uses MPI’s Scatter function to send
each rank the number of agents to initialize as rumor spreaders.
An MPI4Py scatter call takes a collection or array of values created on
one rank (the root rank) and sends the _ith_ element
of that collection or array to rank i. So for example,
rank 0 gets the zeroth element, rank 1 gets the first, and
so on. In _seed_rumor, we use a numpy array of ints as the array
to scatter and the _ith_ element of the array is the number of rumor
spreaders to initialize on rank i.
1
2
3
4
5
6
7
8
9
10
11
12
13
14
15
16
def _seed_rumor(self, init_rumor_count: int, comm):
world_size = comm.Get_size() (1)
# np array of world size, the value of i'th element of the array
# is the number of rumors to seed on rank i.
rumor_counts = np.zeros(world_size, np.int32) (2)
if (self.rank == 0): (3)
for _ in range(init_rumor_count):
idx = random.default_rng.integers(0, high=world_size)
rumor_counts[idx] += 1
rumor_count = np.empty(1, dtype=np.int32) (4)
comm.Scatter(rumor_counts, rumor_count, root=0) (5)
for agent in self.context.agents(count=rumor_count[0], shuffle=True): (6)
agent.received_rumor = True
self.rumor_spreaders.append(agent)
| 1 | Get the total number of ranks over which the simulation is distributed |
| 2 | Initialize a numpy array of world_size with zeros. rumor_counts
will hold the number of initial rumor spreaders for each rank. |
| 3 | If this Model’s rank is 0, then randomly select an index into the
rumor_counts array, and increment the value at that index by one. Do
this for a number of times equal to the initial number of rumors to seed. |
| 4 | Create an empty array of size 1 to receive the number of rumors from the Scatter call. |
| 5 | Scatter the values in rumor_counts from root rank 0 into the rumor_count
array on all the ranks. rumor_count now holds the number of initial
rumor spreaders assigned to the current rank. |
| 6 | Using the SharedContext.agents method, get an iterator over a number of agents equal to
the single value in rumor_count at random (shuffle=True). Set each one of those agent’s received_rumor
attribute to True, and add each one to the Model’s rumor_spreaders list. |
| Using MPI4Py’s Scatter in this way is a useful method for randomly dividing up a total initialization value among ranks. In the RumorModel, we tell each rank to initialize a number of rumor spreaders, and the sum of all these values is the total number of initial rumor spreaders specified by the input parameter. |
Logging
As we saw in Tutorial 1, there are
two types of logging supported by Repast4Py, tabular and reduce-type logging (see the repast4py.logging module
API documentation for more information).
The Rumor model uses the second of these log types. The dataclass that we log records the total number of rumor spreaders and the number of new rumor spreaders added during a tick.
1
2
3
4
@dataclass
class RumorCounts:
total_rumor_spreaders: int
new_rumor_spreaders: int
1
2
3
4
5
6
7
8
9
def __init__(self, comm, params):
...
rumored_count = len(self.rumor_spreaders) (1)
self.counts = RumorCounts(rumored_count, rumored_count) (2)
loggers = logging.create_loggers(self.counts, op=MPI.SUM, rank=self.rank) (3)
self.data_set = logging.ReducingDataSet(loggers, MPI.COMM_WORLD,
params['counts_file']) (4)
self.data_set.log(0) (5)
| 1 | Get the current number of rumor spreaders immediately after rumor seeding |
| 2 | Create the RumorCount instance, setting the total_rumor_spreaders and new_rumor_spreaders
to the current number of rumor spreaders |
| 3 | Create a list of loggers that use self.counts as the source of the data to log,
and that perform a cross process rank summation of that data. The names argument is not
specified, so the RumorCounts field names will be used as column headers. |
| 4 | Create a logging.ReducingDataSet from the loggers where params['counts_file']
is the name of the file to log to. |
| 5 | Log the initial (i.e., tick 0) values from self.counts. |
Scheduled Methods
The Model’s step method is scheduled to execute starting
at tick 1 and then every tick thereafter. It is in the step method that the rumor spreading
is implemented. The implementation is a nested loop that iterates through all the network neighbors
of each rumor spreader. If the network neighbor has not yet received a rumor, is local
to the current rank, and the draw against the probability of a rumor spreading is successful, then
we set the neighbor’s received_rumor attribute to True, and ultimately add it to the
Model’s list of rumor spreaders.
Each repast4py.network.SharedNetwork instance contains a reference to a networkx.Graph
instance named graph. Use graph for any network queries that do not change the
structure of the network. For example, graph.neighbors(n) will return the network neighbors
of agent n. See the networkx API documentation for more info.
|
1
2
3
4
5
6
7
8
9
10
11
12
13
14
15
16
def step(self):
new_rumor_spreaders = [] (1)
rng = random.default_rng
for agent in self.rumor_spreaders: (2)
for ngh in self.net.graph.neighbors(agent):
if not ngh.received_rumor and ngh.local_rank == self.rank \
and rng.uniform() <= self.rumor_prob:
ngh.received_rumor = True
new_rumor_spreaders.append(ngh)
self.rumor_spreaders += new_rumor_spreaders (3)
self.counts.new_rumor_spreaders = len(new_rumor_spreaders) (4)
self.counts.total_rumor_spreaders += self.counts.new_rumor_spreaders (5)
self.data_set.log(self.runner.schedule.tick) (6)
self.context.synchronize(restore_agent) (7)
| 1 | Create a list to hold any new rumor spreaders, i.e., agents whose received_rumor attribute
is set to True during this iteration |
| 2 | For each rumor spreader, iterate through all of its network neighbors. If the network neighbor
has not yet received a rumor, is local to the current rank, and the draw against
the probability of a rumor spreading is successful, then set the neighbor’s received_rumor
attribute to True, and add it to the list of new rumor spreaders. |
| 3 | Add the new rumor spreaders to the list of current rumor spreaders |
| 4 | Set the new number of rumor spreaders on the self.counts log |
| 5 | Set the total number of rumor spreaders on the self.counts log |
| 6 | Log the self.count values for the current tick |
| 7 | Synchronize the model state across all ranks. This will update all
the ghost agent states, calling RumorAgent.update on the ghost agents. |
The list of rumor spreaders (rumor_spreaders) can contain ghost agents. As we saw in
The Rumor Agent, RumorAgent.update is called to update the state of ghost agents. If
the update changes the received_rumor attribute to True, then that ghost agent is added to
the Model’s list of rumor spreaders.
|
Never update the state of a ghost agent. A ghost agent is a mirror of an agent local
to some other process. The ghost agent’s state will be updated from that local source agent
during the synchronize call overwriting any changes. The Rumor Model checks if the local rank
of a rumor spreader’s network neighbor is the current rank (ngh.local_rank == self.rank)
before updating the neighbor’s state in order to avoid updating ghost state.
|
The final event (self.runner.schedule_end_event(self.at_end)) is scheduled to call
Model.at_end when the simulation ends. This method closes the logging data set,
ensuring that any remaining unwritten data is written out.
1
2
def at_end(self):
self.data_set.close()
Do not forget to call close on your logging class instances when the simulation ends.
|
6.3.3. Creating and Restoring RumorAgents
RumorAgents are created during the read_network call in the Model
constructor.
1read_network(fpath, self.context, create_rumor_agent, restore_agent)
There, as part of creating the network, the nodes (i.e., agents)
of that network are also created. Each rank creates the nodes that are assigned to
it using the passed in create_rumor_agent function.
1
2
def create_rumor_agent(nid, agent_type, rank, **kwargs): (1)
return RumorAgent(nid, agent_type, rank)
| 1 | The nid, agent_type, and rank arguments are read from the network
input file and passed to this function. See the repast4py.network.read_network
API documentation for more info. |
As described in Section 6.2, “The Network”, when an edge links two nodes
on different ranks, Repast4Py will create ghost agents as necessary and
create an edge between the ghosts and the local agents. The restore_agent function is
used to create the ghost on the rank it is ghosted to, using the state from
the source agent’s save method.
1
2
3
def restore_agent(agent_data): (1)
uid = agent_data[0]
return RumorAgent(uid[0], uid[1], uid[2], agent_data[1])
| 1 | agent_data is the tuple produced by an agent’s save method. |
6.3.4. Running the Simulation
The simulation is run from the command line. For example, from within the
examples/rumor directory:
mpirun -n 4 python rumor.py rumor_model.yaml
Here we are running the simulation with 4 process ranks and the model input parameters are
in the rumor_model.yaml file.
1
2
3
4
5
network_file: network.txt
initial_rumor_count: 5
stop.at: 100
rumor_probability: 0.1
counts_file: output/rumor_counts.csv
The Rumor Model uses the standard if name == 'main' code block to parse the input parameters and
run the simulation.
1
2
3
4
5
if __name__ == "__main__":
parser = parameters.create_args_parser() (1)
args = parser.parse_args() (2)
params = parameters.init_params(args.parameters_file, args.parameters) (3)
run(params)
| 1 | Create the default command line argument parser |
| 2 | Parse the command line into its arguments using that default parser |
| 3 | Create the model input parameters dictionary from those arguments using
parameters.init_params |
See Parsing Input Parameters in Tutorial 1 for more details.
Lastly we have a simple run function that creates the Model class and calls its
start method which starts the simulation by starting schedule execution. This run function is called
in the if name == 'main' code block.
1
2
3
4
5
6
7
8
def run(params: Dict):
model = Model(MPI.COMM_WORLD, params)
model.start()
class Model:
def start(self):
self.runner.execute() (1)
| 1 | Start the simulation by executing the schedule which calls the scheduled methods at the appropriate times and frequency. |
The code in the run function could be moved to the if name == 'main' code block,
but it is often useful to have an entry type function that initializes and starts a simulation.
|
7. Tutorial 3 - The Zombies Model
In Tutorial 1, we developed a simple model in which agents walk at random around a 2-dimensional Cartesian grid. The Zombies Model builds on this simple movement implementation, adding an additional agent type and using a Continuous Space.
This text assumes you have already read the Repast4Py Users Guide up through Tutorial 1.
In the Zombies model, human agents are pursued by zombie agents, and once caught become zombies themselves. Each timestep, the following occurs:
-
All the Zombies:
-
Query their immediate neighborhood to determine the adjacent grid location with the most number of Humans
-
Move towards that location, assuming any Humans are found
-
Infect the Humans at that location, also assuming any Humans are found
-
-
All the Humans:
-
Become a Zombie, after being infected for 10 timesteps, else
-
Query their immediate neighborhood to determine the adjacent grid location with the fewest number of Zombies
-
Move to that location at twice the speed of a Zombie.
-
See the Repast4Py Examples page to download the source code for this model and for more information on getting started with the examples.
The code consists of the following components:
-
Two agent classes: a Zombie class that implements the behavior of the zombie agents, and a Human class that implements the state and behavior of the human agents.
-
A restore function that creates both Zombie and Human agents when they are moved from one MPI rank to another.
-
A Model class responsible for initializing and managing the simulation and simulation components, including:
-
the model’s context
-
Continuous Space and Discrete Grid projections,
-
Scheduled Events, and
-
-
A GridNghFinder class for quickly computing neighboring grid locations using numpy and the the Numba Python package to accelerate the computation
-
The standard
runfunction that creates and starts the simulation. -
The standard
if name == "main"block in which input parameters are parsed and allows the simulation to be run from the command line.
The Model class instance model is a global variable defined as an attribute of the
zombies module itself. Consequently, it is available to all the code in zombies.py as just
model, that is, you will see it referenced as model rather than self.model or as a
function argument. The Model class contains references to the discrete grid and continuous space
projections as well as the grid neighborhood finder. These are used by the agents
in the implementation of their behavior. By making model a global variable, our
agents can conveniently access these required components.
|
7.1. The Agent Classes
The Zombies model implements two agent classes: a Zombie and a Human. The zombie’s behavior
is to pursue humans across a two dimensional Cartesian space and infect them. The human’s behavior
is to flee from zombies. Humans contain a boolean (infected) field indicating whether or not they are infected, and an integer (infected_duration) field tracking the duration of the infection. When that
value reaches 10, that human is replaced with a zombie. The methods that implement infection, and
the transition from human to zombie are described in the Zombie step method, the the Human step method, and the Model class scheduled step method.
Both agents inhabit two two-dimensional projections:
a SharedGrid and a
SharedCSpace. The
first of these is a matrix type grid where the agent locations are expressible
as discrete integer coordinates. The second is a continuous space where the agent locations
are expressible as continuous floating point coordinates. The grid is used to implement agent
vision. Humans and zombies can see the zombies and humans in the grid locations
that neighbor their own, and act accordingly. The continuous space is used for movement, and
unlike the Walker agents in Tutorial 1 which move a single
grid unit at a time, the human and zombie agents move in fractions of a grid unit,
0.25 for zombies, and 0.5 grid units for humans. In this way, the humans are twice as fast as
the zombies. When a human or zombie moves in the continuous space, a method in the
Model class updates its location in the grid space. These spatial aspects are described in
detail in the Implementing Spatial Projections subsection.
7.1.1. The Zombie Agent
We implement our Zombie agent using the Zombie class. As required for all Repast4Py agent implementations, the Zombie class extends
repast4py.core.Agent, passing it the components of the unique agent id tuple.
1
2
3
4
5
6
7
8
9
10
11
12
from repast4py import core
...
class Zombie(core.Agent): (1)
TYPE = 1 (2)
def __init__(self, a_id, rank):
super().__init__(id=a_id, type=Zombie.TYPE, rank=rank) (3)
...
| 1 | Zombie subclasses repast4py.core.Agent. Subclassing Agent is a requirement for all Repast4Py agent implementations. |
| 2 | TYPE is a class variable that defines the agent type id for the Zombie agents. This is a required part of the unique agent id tuple. |
| 3 | In order to uniquely identify the agent across all ranks in the simulation, the
repast4py.core.Agent constructor takes the following three arguments: an integer id that uniquely identifies an agent on the process where it was created, a non-negative integer identifying the type of the agent, and the rank on which the agent is created. |
The Zombie step() Method
The zombie agent behavior is implemented in its step method. Here, the zombie queries its immediate neighborhood to find the location with the most humans. Assuming some humans are found, the zombie will then move towards that grid location. If multiple grid locations have the maximum number of humans, including when the maximum is 0, the zombie will choose one of those locations at random.
| Each zombie agent is characterized solely by its behavior. That is, the zombie agent does not have an internal state, and is only described by its unique agent tuple id. |
| The 8 member neighborhood of grid cells surrounding an agent’s 2D grid location is called its Moore neighborhood. Given a grid location, its 8 neighbors and the current location are computed using the GrdNghFinder. |
1
2
3
4
5
6
7
8
9
10
11
12
13
14
15
16
17
18
19
20
21
22
23
24
25
26
27
28
29
30
31
32
33
34
35
36
37
38
from repast4py import core, space, schedule, logging, random
from repast4py.space import ContinuousPoint as cpt
from repast4py.space import DiscretePoint as dpt
...
class Zombie(core.Agent):
...
def step(self):
grid = model.grid (1)
pt = grid.get_location(self) (2)
nghs = model.ngh_finder.find(pt.x, pt.y) (3)
at = dpt(0, 0) (4)
maximum = [[], -(sys.maxsize - 1)] (5)
for ngh in nghs: (6)
at._reset_from_array(ngh) (7)
count = 0
for obj in grid.get_agents(at): (8)
if obj.uid[1] == Human.ID:
count += 1
if count > maximum[1]: (9)
maximum[0] = [ngh]
maximum[1] = count
elif count == maximum[1]: (10)
maximum[0].append(ngh)
max_ngh = maximum[0][random.default_rng.integers(0, len(maximum[0]))] (11)
if not np.all(max_ngh == pt.coordinates): (12)
direction = (max_ngh - pt.coordinates[0:3]) * 0.25 (13)
cpt = model.space.get_location(self) (14)
model.move(self, cpt.x + direction[0], cpt.y + direction[1]) (15)
pt = grid.get_location(self) (16)
for obj in grid.get_agents(pt):
if obj.uid[1] == Human.ID:
obj.infect()
break
| 1 | The Model contains both the grid and continuous space in its grid and space fields. The model
variable contains the instance of the Model class. |
| 2 | Get the location of this zombie. This location is a Discrete Point. |
| 3 | Use the Model’s instance of a GridNghFinder to get the Moore neighborhood
coordinates of the zombie’s current location. |
| 4 | Create a temporary DiscretePoint for use in the loop over the Moore neighborhood coordinates. |
| 5 | Initialize a list maximum that will be used to store the current maximum number of
human agents and the location(s) containing that maximum number. The first element
of the list stores the location(s), and the second the current maximum.
We set the initial maximum number of humans as -(sys.maxsize - 1),
the smallest negative integer. Consequently, if there are 0 neighboring humans
then that becomes the new maximum, and the maximum list always contains
at least one location. |
| 6 | Iterate through all the neighboring locations to find the location(s) with the
maximum number of humans. For each neighbor location, we count the number of humans
at that location, and if the total count is equal to or greater than the current maximum, update
or reset the maximum list appropriately. |
| 7 | Reset the the at DiscretePoint to the current neighbor coordinates. This will be used in the get_agents call to come, which takes a DiscretePoint argument and this converts the ngh numpy array to a DiscretePoint. |
| 8 | Get all the agents at the current neighbor location, and iterate through those agents to
count the number of humans. Humans are those agents where the type component of their
unique id tuple is equal to Human.ID. |
| 9 | If the count is greater than the current maximum count, reset the maximum list
to the current location, and maximum count. |
| 10 | If the count is equal to the current maximum count, then append the current location
to the maximum list. |
| 11 | Select one of the maximum neighbor locations at random using Repast4Py’s default random number generator. See the API documentation for more details. |
| 12 | Check if the maximum neighbor location is the zombie’s current location,
using the is_equal function. If not, move the zombie toward the selected location. |
| 13 | Calculate the direction to move by subtracting the zombie’s current location from its desired location. The zombie is only able to move a distance of 0.25 spaces per step (i.e., its speed is 0.25 spaces/tick), and so we multiply the direction vector by 0.25. |
| 14 | Get the zombie’s current location in the continuous space. As with the grid, the Model class
instance model contains the continuous space over which the agents move. |
| 15 | Move the zombie using the Model’s move() method to the location computed by adding the current location
to the direction vector. Model.move() is described in the Implementing Spatial Projections subsection. |
| 16 | Get the zombie’s current location in grid space and infect any humans found at that location. Infection is described in the next section. |
| As each zombie is only moving 0.25 spaces, it is possible for the grid location that a zombie "moves to" to be the same as its grid location before moving. |
Saving the Zombie agent state
To move our zombie agent between processes, we must save its state. Because the zombie agent does not have an internal state, our save method returns only the zombie agent’s unique id tuple.
1
2
3
4
5
6
class Zombie(core.Agent):
...
def save(self):
return (self.uid,)
7.1.2. The Human Agent
The human agent state is composed of two variables:
-
Whether or not the human is infected, and
-
The duration of the infection
Additionally, the human has the following behavior:
-
Querying the current neighborhood for the fewest number of zombies
-
Moving towards the location with the fewest number of zombies
-
Becoming a zombie after 10 time steps, once infected.
We implement our human agents using the Human class, subclassing repast4py.core.Agent, passing it the components of the unique agent id tuple.
The constructor also initializes the infected boolean to False and the duration of infection to 0.
1
2
3
4
5
6
7
8
9
10
11
from repast4py import core
...
class Human(core.Agent): (1)
TYPE = 0 (2)
def __init__(self, a_id, rank):
super().__init__(id=a_id, type=Human.TYPE, rank=rank)
self.infected = False
self.infected_duration = 0
...
| 1 | Human subclasses repast4py.core.Agent. Subclassing Agent is a requirement for all Repast4Py agent implementations. |
| 2 | TYPE is a class variable that defines the agent type id the Human agent. This is a required part of the unique agent id tuple. |
Human Behavior
Each human has three underlying behaviors:
-
Moving towards the area with the fewest zombies
-
Becoming infected by a zombie
The Human step() Method
Much of the human step method is similar to that of the zombie. The human
also queries its Moore neighborhood, and moves in the direction of its
selected location. However, the human is searching for the location with
the fewest number of zombies, and moves to that location. In addition,
the human also increments its infected duration in the step method
and becomes a zombie if infected for 10 time steps.
Given the similarities
with the Zombie step() method only the
relevant differences will be highlighted below.
1
2
3
4
5
6
7
8
9
10
11
12
13
14
15
16
17
18
19
20
21
22
23
24
25
26
27
28
29
30
31
32
33
34
35
36
37
38
39
40
class Human(core.Agent):
...
def step(self):
space_pt = model.space.get_location(self)
alive = True (1)
if self.infected: (2)
self.infected_duration += 1
alive = self.infected_duration < 10
if alive:
grid = model.grid
pt = grid.get_location(self)
nghs = model.ngh_finder.find(pt.x, pt.y)
minimum = [[], sys.maxsize] (3)
at = dpt(0, 0, 0)
for ngh in nghs:
at._reset_from_array(ngh)
count = 0
for obj in grid.get_agents(at):
if obj.uid[1] == Zombie.TYPE:
count += 1
if count < minimum[1]: (4)
minimum[0] = [ngh]
minimum[1] = count
elif count == minimum[1]:
minimum[0].append(ngh)
min_ngh = minimum[0][random.default_rng.integers(0, len(minimum[0]))]
if not is_equal(min_ngh, pt.coordinates):
direction = (min_ngh - pt.coordinates) * 0.5
model.move(self,
space_pt.x + direction[0], space_pt.y + direction[1]) (5)
return (not alive, space_pt) (6)
...
| 1 | Initialize an alive variable that specifies whether or not this human is still alive (not a zombie). |
| 2 | If the human is infected, increment its infection duration. If the infection duration is 10 or more, then set alive to False, indicating that this human should become a zombie. |
| 3 | Initialize a list minimum that will be used to store the current minimum number of
zombie agents and the location(s) containing that minimum number. The first element
of the list stores the location(s), and the second the current minimum.
We set the initial minimum number of humans as sys.maxsize,
the largest integer, so that anything below that counts as the
new minimum value. |
| 4 | Checks if the zombie count is less than the current minimum value, updating appropriately if so. |
| 5 | Moves this human using the same mechanism as the zombie, but twice as far, 0.5 vs 0.25. |
| 6 | Return a tuple of alive and the human’s current location in the continuous space. This is returned
to the Model class calling code, which will replace the human with a zombie if the human is no
longer alive. |
The infect() method
We saw that zombies infect humans by calling the human’s infect() method. This method
simply changes the infected state from False to True.
1
2
3
4
class Human(core.Agent):
...
def infect(self):
self.infected = True
Saving the Human Agent State
To move the human agent between processes, we must save its state. Unlike our zombie agent, saving the human state entails saving its infected and infected_duration states in addition to its unique agent id tuple. The save method for the human agent was described in detail in
Section 4.2, “Saving and Restoring Agents”.
7.1.3. Restoring the Agents
The restore_agent function is used to create an individual zombie or human when that agent has moved to another process. This function is passed to the synchronize method (i.e., self.context.synchronize(restore_agent)) and is called in the synchronization mechanism. This function has also already
been described in detail in Section 4.2, “Saving and Restoring Agents”.
7.2. The Model class
As was demonstrated in the earlier tutorials, the Model class encapsulates the simulation and is responsible for initialization, scheduling events, creating agents and their grid/space environment, and managing logging. In addition, the scheduled events that drive the simulation forward are methods of the Model class.
7.2.1. Scheduling Events and Creating the Context
For the Zombies model, the scheduling of events and the creation of the context are similar to the implementations in the Random Walker Model. Here both are implemented in the Model constructor.
1
2
3
4
5
6
7
8
9
10
11
12
13
14
15
16
17
18
19
20
from repast4py import core, space, schedule, logging, random
from repast4py import context as ctx
from repast4py.parameters import create_args_parser, init_params
...
class Model:
def __init__(self, comm, params):
self.comm = comm
self.context = ctx.SharedContext(comm) (1)
self.rank = self.comm.Get_rank()
self.runner = schedule.init_schedule_runner(comm) (2)
self.runner.schedule_repeating_event(1, 1, self.step) (3)
self.runner.schedule_stop(params['stop.at']) (4)
self.runner.schedule_end_event(self.at_end) (5)
...
...
| 1 | Create a context to hold the agents and the network projection |
| 2 | Initialize schedule runner |
| 3 | Schedule the repeating event of Model.step, beginning at tick 1 and repeating every tick thereafter |
| 4 | Schedule the tick at which the simulation should stop, and events will no longer be executed |
| 5 | Schedule a simulation end event to occur after events have stopped |
7.2.2. Implementing Spatial Projections
After initializing the schedule, adding events, and creating the context to hold the population of agents,
the Model constructor creates the two spatial projections, the
SharedGrid and the
SharedCSpace.
Before we create our projections, we first must define a BoundingBox equal to the desired size of our space:
1
2
3
4
5
6
7
8
9
10
11
12
13
14
15
16
17
18
19
from repast4py import space
...
class Model:
def __init__(self, comm, params):
...
box = space.BoundingBox(0, params['world.width'],
0, params['world.height'], 0, 0) (1)
self.grid = space.SharedGrid('grid', bounds=box, borders=BorderType.Sticky,
occupancy=OccupancyType.Multiple,
buffer_size=2, comm=comm) (2)
self.context.add_projection(self.grid) (3)
self.space = space.SharedCSpace('space', bounds=box, borders=BorderType.Sticky,
occupancy=OccupancyType.Multiple,
buffer_size=2, comm=comm,
tree_threshold=100) (4)
self.context.add_projection(self.space) (5)
| 1 | Create a BoundingBox to initialize the size of the Cartesian spaces. Its
arguments are the minimum x coordinate, the extent of the x dimension, and then the same for
the y and z dimensions. Here we create a 2D box (the z extent is 0) starting at (0,0) and
extending for params['world.width'] in the x dimension and params['world.height'] in
the y dimension. |
| 2 | Create the grid projection. repast4py.space.SharedGrid takes a name, its bounds, its border,
and occupancy types, as well as a buffer size, and a MPI communicator as arguments. See the SharedGrid
API documentation
for a description of these arguments. The concept of a buffer was described in the
Distributed Simulation section. |
| 3 | Add the grid to the context so that it can be properly synchronized across processes |
| 4 | Create the space projection. repast4py.space.SharedCSpace takes a name, its bounds, its border,
and occupancy types, as well as a buffer size, a MPI communicator, and a
tree threshold as arguments. See the SharedCSpace
API documentation
for a description of these arguments. |
| 5 | Add the space to the context so that it can be properly synchronized across processes |
We use two spatial projections in our Zombies model: a discrete grid projection, and a continuous space projection. Even though the space and grid projections are distinct from each other, they are
initialized with the same bounding box. Thus, they are the same size, which allows us to translate between the two projections such that the grid is overlaid on the continuous space. As you have seen, the
grid is used for neighborhood queries, and the continuous space for movement.
Within the Model class, a move method is defined and called during the movement
sections of the agents' step methods (Zombie.step() and Human.step()). This move method performs the translation and movement on both the
grid and continuous space.
1
2
3
4
5
6
7
8
9
10
11
12
13
from repast4py.space import ContinuousPoint as cpt
from repast4py.space import DiscretePoint as dpt
...
class Model:
...
def move(self, agent, x, y): (1)
self.space.move(agent, cpt(x, y)) (2)
self.grid.move(agent, dpt(int(math.floor(x)), int(math.floor(y)))) (3)
...
| 1 | Pass the move method the x and y coordinates in the space projection that the agent
argument is moving to. |
| 2 | Move the agent to the specified point in the continuous space, creating a new ContinuousPoint from
the x and y coordinates. See the move
API documentation for
more details. |
| 3 | Move the agent to the corresponding location in the grid space. The grid takes
a DiscretePoint as its location argument. To create one, we take the floor of the
x and y coordinates, convert those to ints, and create a DiscretePoint from those ints.
See the move
API documentation for
more details. |
7.2.3. Creating the Agents
The population of agents is created within the Model class. The model input
parameters human.count and zombie.count specify the total number of humans and zombies to create.
These total amounts are distributed evenly among each process rank,
with any remainder accounted for by assigning one agent to each rank,
starting with 0, until the total amount has been distributed.
Once the number of agents to create on each rank has been computed, that number of agents is created, assigning each a random location in the grid and continuous space.
1
2
3
4
5
6
7
8
9
10
11
12
13
14
15
16
17
18
19
20
21
22
23
24
25
class Model:
def __init__(self, comm, params):
self.rank = self.comm.Get_rank() (1)
...
world_size = comm.Get_size() (2)
total_human_count = params['human.count'] (3)
pp_human_count = int(total_human_count / world_size) (4)
if self.rank < total_human_count % world_size: (5)
pp_human_count += 1
local_bounds = self.space.get_local_bounds() (6)
for i in range(pp_human_count): (7)
h = Human(i, self.rank) (8)
self.context.add(h) (9)
x = random.default_rng.uniform(local_bounds.xmin, local_bounds.xmin
+ local_bounds.xextent) (10)
y = random.default_rng.uniform(local_bounds.ymin, local_bounds.ymin
+ local_bounds.yextent)
self.move(h, x, y) (11)
...
...
| 1 | Get the rank that is executing this code, the current process rank |
| 2 | Get the number of process ranks over which the simulation is distributed |
| 3 | Get the total number of Humans to create from the input parameters dictionary |
| 4 | Compute the number of Human agents per processor |
| 5 | Increment the number of agents to create on this rank, if this rank’s id is less than the number of remaining agents to create. This will assign each rank, starting with 0, an additional agent in order to reach the total when the total number of agents cannot be evenly divided among all the process ranks. |
| 6 | Get the local bounds of the continuous space. Each rank is responsible for some
part of the total area defined by the space’s bounding box. For example, assuming
4 process ranks, each rank would be responsible for some quadrant of the space.
get_local_bounds returns the area that the calling rank is responsible for as
a BoundingBox. |
| 7 | Iterate through the number of humans to be assigned to each rank |
| 8 | Create a human agent |
| 9 | Add the new human agent to the context |
| 10 | Choose a random x and y location within the current local bounds using repast4py’s default random number generator. See the API documentation for more details. |
| 11 | Move the new human agent to that location, using Model.move. |
The code for creating the zombie agents is nearly identical, except that the
the zombie.count input parameter is used as the total number of agents to create,
and a zombie agent is created rather than a human.
1
2
3
4
5
6
7
8
9
10
11
12
13
14
15
16
17
18
19
20
class Model:
def __init__(self, comm, params):
...
total_zombie_count = params['zombie.count']
pp_zombie_count = int(total_zombie_count / world_size)
if self.rank < total_zombie_count % world_size:
pp_zombie_count += 1
for i in range(pp_zombie_count):
zo = Zombie(i, self.rank)
self.context.add(zo)
x = random.default_rng.uniform(local_bounds.xmin, local_bounds.xmin + local_bounds.xextent)
y = random.default_rng.uniform(local_bounds.ymin, local_bounds.ymin + local_bounds.yextent)
self.move(zo, x, y)
self.zombie_id = pp_zombie_count (1)
...
| 1 | Set the next integer id for newly created zombies to the number of zombies created on this rank.
When a human becomes a zombie, this zombie_id is used as the id of that new zombie, and then incremented
for the next time a human becomes a zombie. |
7.2.4. Logging
As we saw in Tutorial 1, there are
two types of logging supported by Repast4Py, tabular and reduce-type logging (see the repast4py.logging module
API documentation for more information).
The Zombies model uses the second of these log types. The dataclass that we log records the total number of humans and zombies each tick.
Initializing Logging
1
2
3
4
5
6
7
8
9
10
11
12
13
@dataclass
class Counts:
humans: int = 0
zombies: int = 0
class Model:
def __init__(self, comm, params):
...
self.counts = Counts() (1)
loggers = logging.create_loggers(self.counts, op=MPI.SUM, rank=self.rank) (2)
self.data_set = logging.ReducingDataSet(loggers, self.comm, params['counts_file']) (3)
| 1 | Create the Counts instance that we use to record the number of humans and zombies
on each rank |
| 2 | Create a list of loggers that use self.counts as the source of the data to log,
and that perform a cross process rank summation of that data. The names argument is not
specified, so the Counts field names will be used as column headers. |
| 3 | Create a logging.ReducingDataSet from the list of loggers. params['counts_file'] is the name of the file to log to. |
The log_counts Method
At each tick the log_counts method is called by Model.step() to record the number
of humans and zombies at that tick.
1
2
3
4
5
6
7
8
class Model:
def log_counts(self, tick):
# Get the current number of zombies and humans and log
num_agents = self.context.size([Human.TYPE, Zombie.TYPE]) (1)
self.counts.humans = num_agents[Human.TYPE] (2)
self.counts.zombies = num_agents[Zombie.TYPE] (3)
self.data_set.log(tick) (4)
| 1 | Get the number of agents of the specified types currently in the context.
context.size
takes a list of agent type ids and returns a dictionary where the type ids are the keys
and the values are the number of agents of that type. |
| 2 | Set the self.counts.humans to the number of humans |
| 3 | Set the self.counts.zombies to the number of zombies |
| 4 | Log the values for the specified tick. This will sum the values in self.counts
across all the ranks and log the results. |
7.2.5. Scheduled Methods
The events for this model are methods defined within the Model class.
Step
The first of our scheduled events is the step method, which is scheduled to execute starting at tick 1 and for every tick thereafter:
1
2
3
4
5
6
7
8
9
10
11
12
13
14
15
16
17
18
19
20
21
class Model:
...
def step(self):
tick = self.runner.schedule.tick (1)
self.log_counts(tick) (2)
self.context.synchronize(restore_agent) (3)
for z in self.context.agents(Zombie.TYPE): (4)
z.step()
dead_humans = [] (5)
for h in self.context.agents(Human.TYPE): (6)
dead, pt = h.step()
if dead: (7)
dead_humans.append((h, pt))
for h, pt in dead_humans: (8)
model.remove_agent(h)
model.add_zombie(pt)
| 1 | Get the current tick value from the schedule runner |
| 2 | Log the current number of humans and zombies by calling the log_counts method. |
| 3 | Synchronize the state of the simulation across processes using the restore_agent function to restore any agents (Zombies and Humans) that have moved processes. See Section 4.2, “Saving and Restoring Agents” for more details. |
| 4 | Iterate over all the Zombie agents in the model, calling step on each one. |
| 5 | Create an empty list for collecting the dead humans and their current location. This is used
later in step to replace the humans with zombies. |
| 6 | Iterate over all the human agents in the model, calling step on each one.
Human.step returns a boolean that indicates whether or not the Human has died (and thus should become a Zombie), and the current location of that human. |
| 7 | If the human has died, then append it and its current location to the dead_humans list. |
| 8 | Iterate over the dead human data, removing the human from the model, and replacing it with a zombie at its former location. |
The iterator returned from SharedContext.agents is not modifiable during
iteration, that is, it is not possible to remove an agent from the SharedContext as part
of the iteration.
|
Given that it is not possible to remove an agent as part of iteration, we need to
collect the humans to remove in a list. After the iteration has completed,
we can iterate over that list, and remove the agents using Model.remove_agent.
1
2
3
4
class Model:
def remove_agent(self, agent):
self.context.remove(agent) (1)
| 1 | Remove the agent from the context. |
Humans are converted into zombies in the add_zombie() method, which adds a new zombie agent at the final location of the newly removed human.
1
2
3
4
5
6
7
class Model:
def add_zombie(self, pt): (1)
z = Zombie(self.zombie_id, self.rank) (2)
self.zombie_id += 1 (3)
self.context.add(z) (4)
self.move(z, pt.x, pt.y) (5)
| 1 | The final location of the human agent that just died is passed into the add_zombie method |
| 2 | Create a new zombie agent, using the zombie_id field instantiated in the constructor |
| 3 | Increment the zombie_id to create the id for the next created zombie |
| 4 | Add the newly created zombie to the Model’s context |
| 5 | Move the zombie to the location of the dead human the zombie is replacing |
At End
Model.at_end runs when the simulation reaches its final tick and ends. This method closes the data_set log, ensuring that any remaining unwritten data is written to the output file.
1
2
3
4
class Model:
def at_end(self):
self.data_set.close()
7.3. The Grid Neighborhood Finder
Every agent at every tick must search their neighborhood of grid locations to determine which grid location has the most humans or the fewest zombies. Because this neighborhood of grid locations is dependent on each agent’s current location, the neighborhood must be computed every tick for every agent. If, for example, the simulation is run for 50 ticks and 8400 agents, the neighborhood finding code is run over 400,000 times. Consequently, neighborhood finding is a good candidate for optimization, and a good example of how such an optimization can be implemented using 3rd party Python libraries.
The GridNghFinder is a class that can quickly compute these neighboring grid locations
using the NumPy and
Numba Python packages. NumPy is a fundamental Python package for
scientific computing, providing support for multi-dimensional arrays and matrices, along with
fast, optimized mathematical functions that operate on those arrays. Numba is a just-in-time compiler for Python. It can compile certain kinds of Python functions and classes into optimized
native machine code that bypasses the slower Python interpreter.
It is particularly useful for code that is numerically oriented and uses NumPy arrays.
The Numba library provides a useful "5 minute guide to Numba" overview on their package’s webpage. We encourage you to take a look at that page for more information regarding how and why such a package may be useful when implementing your model. Similarly,
more information on NumPy and whether it might be useful for your model can be found here.
|
We implement our GridNghFinder as a class. Neighborhood finding in the GridNghFinder
works by taking a location and adding an array of offsets to that location to create a new array consisting of the neighboring
coordinates. For example, if we want to get the left and right coordinate values along the x-axis
for an x coordinate of 4, we can add the array [-1, 1] to 4 resulting in the array [3, 5]. The
GridNghFinder performs this operation using 9 element offset arrays in both the x and y
dimensions. 9 elements yields the Moore neighborhood coordinates as well as the original
center location. The GridNghFinder also performs some additional checks
to make sure that the coordinates are not outside of the bounds of the grid.
The arrays in this case are NumPy arrays, and given the numeric
nature of the operation, Numba can compile it into native code.
In order to utilize Numba for our GridNghFinder class, we must first declare the native data types of the fields used in our class.
1
2
3
4
5
6
7
8
9
10
from numba import int32
spec = [ (1)
('mo', int32[:]), (2)
('no', int32[:]),
('xmin', int32), (3)
('ymin', int32),
('ymax', int32),
('xmax', int32)
]
| 1 | Create a Numba class specification. The specification is a list of tuples, where each tuple consists of a field name, and the native type of that field. The names correspond to the field names in the class for which this is the specification. |
| 2 | Create a tuple for the mo field with a NumPy array of 32-bit integers as its type. |
| 3 | Create a tuple for the xmin field with a 32-bit integer type. |
See the Numba API documentation
for @jitclass for more details on compiling classes with Numba.
The GridNghFinder constructor initializes the offset arrays and global grid bounds.
1
2
3
4
5
6
7
8
9
10
11
12
from numba.experimental import jitclass (1)
@jitclass(spec) (2)
class GridNghFinder:
def __init__(self, xmin, ymin, xmax, ymax): (3)
self.mo = np.array([-1, 0, 1, -1, 0, 1, -1, 0, 1], dtype=np.int32) (4)
self.no = np.array([1, 1, 1, 0, 0, 0, -1, -1, -1], dtype=np.int32)
self.xmin = xmin (5)
self.ymin = ymin
self.xmax = xmax
self.ymax = ymax
| 1 | Import the numba.jitclass decorator |
| 2 | Decorate GridNghFinder with jitclass passing our spec that defines the field types |
| 3 | Pass the global grid bounds to the constructor as x and y maximum and minimum values |
| 4 | Create the mo and no offset arrays containing the specified 32-bit integers |
| 5 | Set the minimum and maximum possible x and y values from the passed in global grid bounds |
The neighborhood coordinate computation is performed in the find method.
 1
 2
 3
 4
 5
 6
 7
 8
 9
10
11
12
13    def find(self, x, y):    (1)
        xs = self.mo + x    (2)
        ys = self.no + y    (3)

        xd = (xs >= self.xmin) & (xs <=self.xmax)    (4)
        xs = xs[xd]   (5)
        ys = ys[xd]   (6)

        yd = (ys >= self.ymin) & (ys <= self.ymax)    (7)
        xs = xs[yd]
        ys = ys[yd]

        return np.stack((xs, ys, np.zeros(len(ys), dtype=np.int32)), axis=-1)    (8)
| 1 | The find method takes a 2D location specified as x and y coordinates. This location
is the location we want the neighboring coordinates of. |
| 2 | Add the x offset array to the x coordinate, resulting in a new array xs that contains the
neighboring x-axis coordinates. |
| 3 | Add the y offset array to the y coordinate, resulting in a new array ys that contains the
neighboring y-axis coordinates. |
| 4 | Compute the array indices in the xs array whose values are within the global x-axis bounds. |
| 5 | Keep only those values from xs, assigning that array to xs |
| 6 | Do the same for the ys array. If an x value is out of bounds, we discard its corresponding y value. |
| 7 | Compute the array indices in the ys array whose values are within the global y-axis bounds.
Then reset xs and ys to contain only the values at those indices. |
| 8 | Combine the xs and ys indices with each other and a z-axis coordinate array of all zeros
to create an array of arrays where the inner arrays are 3D points consisting of
x, y, and z coordinates. This 3 element array format is necessary to reset the
repast4py.space.DiscretePoint at variable that is used in both the Zombie step, method and the Human step method. |
7.4. Running the Simulation
The simulation is run from the command line. For example, from within the
examples/zombies directory:
mpirun -n 4 python zombies.py zombie_model.yaml
Here we are running the simulation with 4 process ranks and the model input parameters are
in the zombie_model.yaml file.
1
2
3
4
5
6
7
8
random.seed: 42
stop.at: 50.0
human.count: 8000
zombie.count: 400
world.width: 200
world.height: 200
run.number: 1
counts_file: './output/agent_counts.csv'
The Zombie Model uses the standard if name == 'main' code block to parse the input parameters and
run the simulation.
1
2
3
4
5
if __name__ == "__main__":
parser = parameters.create_args_parser() (1)
args = parser.parse_args() (2)
params = parameters.init_params(args.parameters_file, args.parameters) (3)
run(params) (4)
| 1 | Create the default command line argument parser |
| 2 | Parse the command line into its arguments using that default parser |
| 3 | Create the model input parameters dictionary from those arguments using
parameters.init_params |
| 4 | Call the run function to run the simulation. |
See Parsing Input Parameters in Tutorial 1 for more details.
The run function creates the Model class and calls its run method, which then begins the simulation by initiating schedule execution. This run function is called in the if name == 'main' code block.
1
2
3
4
5
6
7
8
9
10
11
from mpi4py import MPI
def run(params: Dict):
global model (1)
model = Model(MPI.COMM_WORLD, params) (2)
model.run()
class Model:
def run(self):
self.runner.execute() (3)
| 1 | Use the global keyword to indicate that model refers to the module level model variable
and not a local variable |
| 2 | Create the model instance, passing the Model constructor the MPI world communicator and the input parameters dictionary |
| 3 | Start the simulation by executing the schedule which calls the scheduled methods at the appropriate times and frequency |
The code in the run function could be moved to the if name == 'main' code block,
but it is often useful to have an entry type function that initializes and starts a simulation.
|
8. Checkpointing
Checkpointing is a technique that saves the state of a Repast4Py model at a specific tick such that the model can be restored and continued from that tick. This can be useful when a model run may be interrupted (e.g., the walltime of an HPC resource on which the model is running may expire), or when a model requires a burn-in period to reach some stability before running experiments with the model. In the first case, periodic checkpointing allows the model to continue from when it was interrupted, and in the second case the model can be checkpointed after burn-in, and subsequent experiments can restore the model to run from that point on, rather than having to complete the burn-in period for each experiment.
| In addition to the text below, the checkpointing unit tests contain good examples for how to checkpoint various parts of a model. |
8.1. How to Checkpoint
Checkpointing a Repast4Py model uses a Checkpoint instance in the repast4py.checkpoint module to:
-
Save the current state of the random number generator
-
Save the current state of all the agents
-
Save the simulation schedule
-
Save any additional simulation components
Once the various parts of the simulation have been saved into the Checkpoint instance, that instance can be written to a file using the dill package. To restore a simulation, the Checkpoint instance is unpickled from its saved file, and its various restore methods are used to create agents, initialize the schedule, and any additional simulation components, from their saved representations. These are assigned in a new model instance, rather than saving the original model instance.
8.1.1. Saving a Checkpoint to a File
A checkpoint can be pickled (saved) and unpickled (restored) to and from a file with the following code:
1
2
3
4
5
6
7
8
9
10
import dill
def pickle(fname, checkpoint: Checkpoint):
with open(fname, 'wb') as fout:
dill.dump(checkpoint, fout)
def unpickle(fname):
with open(fname, 'rb') as fin:
obj = dill.load(fin)
return obj
| While dill can serialize most Python types, there are exceptions. Consequently, you have may have to translate some Python object types to those amenable to serialization (e.g., to strings and numbers). |
8.1.2. Checkpointing the Random State
The current state of the default random number generator, repast4py.random.default_rng,
can be saved to a checkpoint using the Checkpoint.save_random
method.
1
2
3
4
ckp = checkpoint.Checkpoint()
ckp.save_random() (1)
...
pickle(f"checkpoint_{MPI.COMM_WORLD.Get_rank()}.ckp", ckp) (2)
| 1 | Saves the random state |
| 2 | Saves the checkpoint to the specified file using pickle defined above, adding the current rank to the file name to separate it from checkpoints saved on other ranks |
Checkpoint.restore_random is used to restore the random state, resetting the repast4py.random.default_rng to the saved state.
1
2
ckp = unpickle(f"checkpoint_{MPI.COMM_WORLD.Get_rank()}.ckp") (1)
ckp.restore_random() (2)
| 1 | Restores the saved checkpoint from the specified file using unpickle defined above |
| 2 | Restores the random state |
8.1.3. Checkpointing Agents
Checkpoint.save_agents and
Checkpoint.restore_agents are used to save and restore agents. They use the same save and restore pattern that is used to move and copy agents between processes (see
Saving and Restoring Agents). There, an agent must implement a save method that
captures the agent’s state in a tuple and a restore function must be provided that creates an agent
from that tuple.
1
2
3
4
5
6
7
8
9
10
11
12
13
14
15
16
17
18
class EAgent(core.Agent): (1)
def __init__(self, id, agent_type, rank, val):
super().__init__(id=id, type=agent_type, rank=rank)
self.vals = [val] (2)
def append_val(self, val):
self.val.append(val)
def save(self) -> Tuple: (3)
return (self.uid, self.vals)
agents = [EAgent(i, 0, 0) for i in range(20)] (4)
ckp = checkpoint.Checkpoint()
ckp.save_agents(agents) (5)
pickle(f"checkpoint_{MPI.COMM_WORLD.Get_rank()}.ckp", ckp)
| 1 | An example Repast4Py agent |
| 2 | The agent state (self.vals), a list of values. |
| 3 | The save method that returns a tuple, consisting of the agent’s
unique id, and its state |
| 4 | Creates a list of example agents |
| 5 | Saves the agents into ckp, a Checkpoint instance |
Checkpoint.restore_agents uses a user provided function to create the agents from the saved data.
1
2
3
4
5
6
7
8
9
def restore_agent(agent_data: Tuple): (1)
uid = agent_data[0]
vals = agent_data[1]
agent = EAgent(uid[0], uid[1], uid[2], None) (2)
agent.vals = vals
return agent
ckp = unpickle(f"checkpoint_{MPI.COMM_WORLD.Get_rank()}.ckp")
agents = [agent for agent in ckp.restore_agents(restore_agent)] (3)
| 1 | The function used to recreate an agent from a saved tuple |
| 2 | Creates the agent from the saved tuple. Note that we pass
None for the val and set the agent’s vals field to the saved
value in the next line. |
| 3 | Creates a list of agents from the saved agent state using the restore_agent function |
Checkpoint.restore_agent returns a generator that can be used in a for loop
to add agents to a model’s context, for example.
|
8.1.4. Checkpointing the Simulation Schedule
Saving a schedule to a Checkpoint uses the Checkpoint.save_schedule
method. It iterates over all the events in the current SharedScheduleRunner, and saves them. However, the user
must provide enough metadata when scheduling the events such that they can be recreated using a
user defined function. The metadata is typically a dictionary.
1
2
3
4
5
6
7
8
9
10
11
12
13
14
15
16
17
18
19
20
21
22
23
24
25
26
27
class Model: (1)
def __init__(self, comm: MPI.Intracomm):
self.context = SharedContext(comm)
# add agents to the context
...
def step(self):
for agent in self.context.agents():
agent.move()
def update(self):
for agent in self.context.agents():
agent.update()
model = Model(comm)
runner = schedule.init_schedule_runner(MPI.COMM_WORLD)
runner.schedule_repeating_event(1.0, 1.0, model.step, (2)
metadata={'name': 'model.step'})
runner.schedule_repeating_event(10.0, 10.0, model.update, (3)
metadata={'name': 'model.update'})
...
ckp = checkpoint.Checkpoint()
ckp.save_schedule() (4)
pickle(f"checkpoint_{MPI.COMM_WORLD.Get_rank()}.ckp", ckp)
| 1 | An example model containing agents, a step method that
calls move on all its agents, and an update method that calls update on all its agents |
| 2 | Schedules model.step as an event, adding a metadata
dictionary that provides the name of the event being scheduled.
The name can be used to restore the event correctly. |
| 3 | Schedules model.update as an event, adding a metadata
dictionary that provides the name of the event being scheduled. |
| 4 | Saves the events scheduled on the runner to the checkpoint instance |
The schedule is restored with Checkpoint.restore_schedule. Restoring the schedule from a checkpoint requires a function which takes each saved scheduled event’s metadata and returns the event to schedule. Recreating the event often requires a reference to another instance, such as the model, or a specific agent or agents. In that case, the restore function can be defined within a function where the required instances (e.g., model or agents) are available. For example,
1
2
3
4
5
6
7
8
9
10
11
12
def restore_checkpoint():
model = Model(MPI.COMM_WORLD) (1)
def restore_events(data): (2)
name = data["name"]
if name == "model.step":
return model.step
elif name == "model.update":
return model.update
ckp = unpickle(f"checkpoint_{MPI.COMM_WORLD.Get_rank()}.ckp")
runner = ckp.restore_schedule(MPI.COMM_WORLD, restore_events) (3)
| 1 | A model instance whose methods we want to restore as scheduled events |
| 2 | The function used to recreate the events from the checkpoint. It is
passed the metadata from each saved event, and should return a corresponding
event. In this case, the name is used to determine which method of the
model to return. |
| 3 | Restores the schedule from the checkpoint using the restore_events function.
The current tick will be set to the tick at which the checkpoint occurred, and
all the events wil be scheduled appropriately. |
In the above, restore_event has access to the model instance it needs by virtue of
being defined inside the function where model is created.
If an event needs access to a particular agent, that agent’s id can be specified as part of the scheduling metadata.
1
2
3
4
5
6
7
8
9
10
11
12
13
14
15
16
17
18
19
class UpdateEvent: (1)
def __init__(self, agent, val):
self.agent = agent
self.val = val
def __call__(self):
self.agent.append_val(self.val)
agent = EAgent(1, 1, 1, 0)
evt = UpdateEvent(agent, 12.2)
schedule.runner().schedule_event(22.2, evt, metadata={"name": "UpdateEvent", (2)
"val": evt.val, "uid": evt.agent.uid})
...
ckp = checkpoint.Checkpoint()
ckp.save_schedule()
pickle(f"checkpoint_{MPI.COMM_WORLD.Get_rank()}.ckp", ckp)
| 1 | An example event that updates a specific agent by appending a value to that agent’s list of values |
| 2 | Schedules the event, adding metadata that identifies event, the agent and the value for that event |
To restore this event, we need a dictionary of agents keyed by agent uid in order to select the correct agent by id when recreating the event.
1
2
3
4
5
6
7
8
9
10
11
12
def restore_checkpoint():
...
ckp = unpickle(f"checkpoint_{MPI.COMM_WORLD.Get_rank()}.ckp")
agents = {agent.uid : agent for agent in ckp.restore_agents(restore_agent)} (1)
def restore_events(data): (2)
name = data["name"]
if name == "UpdateEvent":
val = data["val"]
uid = data["uid"]
agent = agents[uid]
return UpdateEvent(agent, val)
| 1 | Restore the saved agents into a dictionary with agent.uid as the key |
| 2 | A restore function that gets the UpdateEvent’s agent instance from a dictionary of agents,and recreates the event using that agent and the saved value. |
Checkpoint.restore_schedule has additional optional arguments to handle more complex scheduling situations (e.g., if the restored scheduled events need to be used outside the schedule itself). See the API Docs for additional details.
8.1.5. Checkpointing Additional State
It is also possible to save any additional state values as key value pairs in a Checkpoint instance, using Checkpoint.save and Checkpoint.restore.
Checkpoint.save takes a key, and the value to be saved as arguments. The value can be retrieved on restore using the
key value.
1
2
3
4
5
6
model = ...
ckp = Checkpoint()
model_props = [model.a, model.b, model.c] (1)
ckp.save('mprops', model_props) (2)
pickle(f"checkpoint_{MPI.COMM_WORLD.Get_rank()}.ckp", ckp)
| 1 | 3 example model state values stored in a list |
| 2 | Saves the list containing the model values into the checkpoint identifying
them with the key mprops |
Checkpoint.restore takes the key associated with the saved value, and a Callable, which will be passed the saved value and any other arguments passed to restore. The Callable can perform additional manipulation of the saved value.
1
2
3
4
5
6
7
8
9
10
11
def restore_checkpoint():
model = Model(MPI.COMM_WORLD)
...
def restore(data, model): (1)
model.a = data[0]
model.b = data[1]
model.c = data[2]
ckp = unpickle(f"checkpoint_{MPI.COMM_WORLD.Get_rank()}.ckp")
ckp.restore("mprops", restore, model) (2)
| 1 | A function for restoring the 3 saved properties to the model |
| 2 | Restores the 3 properties to the model by retrieving the list
value using its mprops key, calling the provided restore function,
and passing the model instance to that function. |
8.1.6. Checkpointing Grid and Continuous Space Projections
Checkpointing the grid and continuous space projections is done with the Checkpoint.save_space method. This saves all the locations of a context’s agents in a specified space to the checkpoint. Restoring requires that the user provide a context with restored agents, and an empty grid or continuous space instance to the Checkpoint.restore_space method. This method will retrieve the saved agent locations in the grid or space from the checkpoint using the name of the space, and move the agents to those locations.
| The same save and restore methods, Checkpoint.save_space and Checkpoint.restore_space, are used for saving and restoring both SharedGrid and SharedCSpace instances. |
1
2
3
4
5
6
7
8
9
10
11
box = BoundingBox(0, 40, 0, 40, 0, 0)
grid = SharedGrid('grid', bounds=box, borders=BorderType.Sticky, occupancy=OccupancyType.Multiple,
buffer_size=2, comm=comm) (1)
context.add_projection(grid)
# move agents around the grid
...
ckp = checkpoint.Checkpoint()
ckp.save_agents(context.agents())
ckp.save_space(context, grid) (2)
pickle(f"checkpoint_{MPI.COMM_WORLD.Get_rank()}.ckp", ckp)
| 1 | An example SharedGrid to checkpoint |
| 2 | Saves the agent locations in the grid to the checkpoint |
Prior to restoring a grid or continuous space, the context must be filled with the restored agents, and the grid or continuous space instance initialized.
1
2
3
4
5
6
7
8
9
10
11
12
13
14
15
context = SharedContext(comm)
box = BoundingBox(0, 40, 0, 40, 0, 0)
grid = SharedGrid('grid', bounds=box, borders=BorderType.Sticky, occupancy=OccupancyType.Multiple,
buffer_size=2, comm=comm) (1)
context.add_projection(grid)
def restore_agent(data):
uid = data[0]
return OAgent(uid[0], uid[1], uid[2])
ckp = unpickle(f"checkpoint_{MPI.COMM_WORLD.Get_rank()}.ckp")
for agent in ckp.restore_agents(restore_agent): (2)
context.add(agent)
ckp.restore_space(context, grid) (3)
| 1 | Recreating the saved SharedGrid instance |
| 2 | Adds the restored agents to the context |
| 3 | Restores the agents to their checkpointed locations within the grid |
As noted above, this same save and restore example applies to a SharedCSpace instance as well, replacing only the grid SharedGrid with a SharedCSpace instance in the above example code.
8.1.7. Checkpointing Network Projections
Like the grid and continuous spaces, networks can be individually saved with Checkpoint.save_network. and restored with Checkpoint.restore_network.
1
2
3
4
5
6
7
8
9
10
11
12
13
14
comm = MPI.COMM_WORLD
context = SharedContext(comm)
read_network("./test_data/sample_network.txt", self.context,
create_net_agent, restore_net_agent) (1)
rank = comm.Get_rank()
network: UndirectedSharedNetwork = self.context.get_projection("sample_network") (2)
...
ckp = checkpoint.Checkpoint()
ckp.save_random()
ckp.save_agents(context.agents())
ckp.save_network(network, MPI.COMM_WORLD.Get_rank()) (3)
pickle(f"checkpoint_{rank}.ckp", ckp)
| 1 | Creates an example network using the network module’s read_network function |
| 2 | Gets a reference to the created network |
| 3 | Saves the network to the checkpoint |
1
2
3
4
5
6
7
8
9
10
11
12
13
14
15
16
comm = MPI.COMM_WORLD
context = SharedContext(comm)
def create_agent(data):
uid = data[0]
return EAgent(uid[0], uid[1], uid[2], data[1])
rank = comm.Get_rank()
ckp = unpickle(f"checkpoint_{rank}.ckp")
ckp.restore_random()
for agent in ckp.restore_agents(create_agent): (1)
context.add(agent)
network = UndirectedSharedNetwork("sample_network", comm) (2)
context.add_projection(network) (3)
ckp.restore_network(context, network, create_agent) (4)
| 1 | Restores the agents and adds them to the context (a prerequisite for restoring a network) |
| 2 | Creates the network to be restored |
| 3 | Adds the network to the context |
| 4 | Restores the network adding the saved edges, including cross process ones. |
8.1.8. Checkpointing Distributed Models
Each rank in a distributed model should save its own checkpoint, typically incorporating its rank into the checkpoint file name as in the examples above. After each rank restores its own checkpoint, a SharedContext.synchronize should be performed to synchronize the simulation state across all processes.
| Do not forget to call SharedContext.synchronize after restoring from a checkpoint and before running the schedule. |